
This handy tutorial shows you how to extend the WordPress Media Library so you can find images that are missing their ALT Text. This is useful when you’re running a WooCommerce store with lots of product images, and you want to scan through the library and see what SEO opportunities you’re missing out on.
It’s a back-end/admin tutorial, but we’ll need somewhere to put the PHP code, so make sure you’re using a custom child theme.
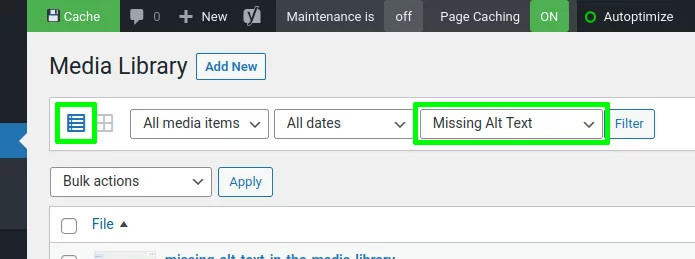
Before continuing, put your Media Library into List View mode, rather than the modal Grid View mode. This is so we can create custom columns, and tinker with the filter tool bar.
Featured plugin

We’re going to do two useful things with this little project:
Filter Images With/Without ALT Text
Create a custom item in the Media Library’s filter tool bar, with options to filter the media library for:
- images that do have ALT Text
- images that do NOT have ALT Text

Add an ALT Text Present/Missing Column
Add an admin column so you can see which images are missing ALT Text, even when the list is not filtered.

Setting Up the Project
In your child theme, create a file called “wpt-find-missing-alt.php” and a folder called “wpt-find-missing-alt”. In the new folder, create an empty file called “wptfma-admin.css”. Paste the following into wpt-find-missing-alt.php to get things started.
<?php

/**
 * WP Tutorials : Find Missing ALT Texts (WPTFMA)
 *
 * https://wp-tutorials.tech/refine-wordpress/filter-for-images-missing-alt-text/
 *
 * Changes:
 *
 * 2024-11-17 : Updated the list of supported image/MIME types to include AVIF and others.
 *              Code contributed by Walid
 */

defined('WPINC') || die();

const WPTFMA_FIELD_NAME = 'filter_img_alt';

const WPTFMA_IMAGE_MIME_TYPES = array(
	'image/png', 'image/jpg', 'image/jpeg', 'image/gif', 'image/ico', 'image/bmp',
	'image/webp', 'image/heic', 'image/heif', 'image/svg', 'image/avif', 'image/tiff',
	'image/x-icon' );

function wptfma_is_on_media_admin_page() {
	$is_on_page = false;

	if (!function_exists('get_current_screen')) {
		require_once ABSPATH . '/wp-admin/includes/screen.php';
	}

	if (is_admin() && !empty($screen = get_current_screen())) {
		$is_on_page = ($screen->base == 'upload');
	}

	return $is_on_page;
}

function wptfma_get_filter_options() {
	return array(
		'no-filter' => '-- IMG ALT Text --',
		'only-with-alt' => 'Images with ALT',
		'only-without-alt' => 'Images missing ALT',
	);
}

function wptfma_get_filter_from_query_args() {
	$selected_filter_option = null;
	$valid_filter_options = wptfma_get_filter_options();

	if (array_key_exists(WPTFMA_FIELD_NAME, $_GET)) {
		$selected_filter_option = sanitize_text_field($_GET[WPTFMA_FIELD_NAME]);
	}

	if (empty($selected_filter_option) || !array_key_exists($selected_filter_option, $valid_filter_options)) {
		$selected_filter_option = 'no-filter';
	}

	return $selected_filter_option;
}
Next, open your child theme’s functions.php and add the following couple of lines:
// Find and filter the Media Library for images missing ALT Texts.
require_once dirname(__FILE__) . '/wpt-find-missing-alt.php';
Save all that and reload your site to make sure nothing’s broken.
Notice that we’ve got three utility functions in there:
wptfma_is_on_media_admin_page()
Returntrueif we’re on the media library page.wptfma_get_filter_options()
Returns an associative array of our valid filter options, and the corresponding labels for the<option>elements.wptfma_get_filter_from_query_args()
Checks the$_GETarray to see if our filter option is in there. Returns either the selected filter option (if it’s valid) or “no-filter”.
Creating the Custom Filter
The way that Media Library filtering works is with standard GET request query args. You can try it out before we start. Go to the drop down list that says “All media items”, pick “Images” and then press the “Filter” button. You’ll see the new filter options set out in the URL as query args:
.../upload.php?mode=list&attachment-filter=post_mime_type%3Aimage&...This is saying that the “attachment-filter” is set to “post_mime_type:image” (%3A is the URL-encoded value for a colon character). So all we need to do is add a new option into this URL that says something like:
...&filter_img_alt=only-with-altWe can pick this up in the PHP using the standard PHP $_GET['...'] variable and then modify the main WordPress query using the pre_get_posts action.
Right! Let’s write the code. Open wpt-find-missing-alt.php and paste the following to the end of it:
/**
 * If we're rendering the list-view media library page, add a drop-down list
 * to the filter bar with our IMG ALT filter options.
 */
function wptfma_render_drop_down_filter_options() {
	if (!wptfma_is_on_media_admin_page()) {
		// We're not on the list-view media page in the back-end.
	} else {
		printf('<select name="%s">', esc_attr(WPTFMA_FIELD_NAME));

		$selected_filter_option = wptfma_get_filter_from_query_args();
		$valid_filter_options = wptfma_get_filter_options();
		foreach ($valid_filter_options as $value => $label) {
			$props = '';

			if ($selected_filter_option == $value) {
				$props = 'selected';
			}

			printf(
				'<option value="%s" %s>%s</option>',
				esc_attr($value),
				$props,
				esc_html($label)
			);
		}

		echo '</select>';
	}
}
add_action('restrict_manage_posts', 'wptfma_render_drop_down_filter_options');

/**
 * Be careful in here. This function runs on every page for every WordPress
 * query. We only want to adjust the query if we're on the media page and the
 * query that's running is the main query - i.e. the query that returns all the
 * media attachments.
 */
function wptfma_pre_get_posts($query) {
	if (!wptfma_is_on_media_admin_page()) {
		// We're not on the list-view media page in the back-end.
	} elseif (!$query->is_main_query()) {
		// We're not on the main query, so don't do anything.
	} elseif (empty($selected_filter_option = wptfma_get_filter_from_query_args())) {
		// The user hasn't chosen an IMG ALT Text filter option.
	} elseif ($selected_filter_option == 'no-filter') {
		// The user has selected the "no-filter" option, so don't do anything.
	} else {
		$img_alt_meta_query = null;

		if ($selected_filter_option == 'only-with-alt') {
			$img_alt_meta_query = array(
				'key' => '_wp_attachment_image_alt',
				'compare' => 'EXISTS',
			);
		} elseif ($selected_filter_option == 'only-without-alt') {
			$img_alt_meta_query = array(
				'key' => '_wp_attachment_image_alt',
				'compare' => 'NOT EXISTS',
			);
		} else {
			// ...
		}

		if (!empty($img_alt_meta_query)) {
			$meta_query = $query->get('meta_query');

			if (!is_array($meta_query)) {
				$meta_query = array(
					'relation' => 'AND',
				);
			}

			$meta_query[] = $img_alt_meta_query;

			// Set the query's "meta_query" to n=our filter.
			$query->set('meta_query', $meta_query);

			// We also want to only include posts (attachments) that have an image
			// in "post_mime_type" like this:
			$query->set('post_mime_type', WPTFMA_IMAGE_MIME_TYPES);
		}
	}
}
add_action('pre_get_posts', 'wptfma_pre_get_posts');
It breaks down into two functions, each of which responds to an action hook:
- restrict_manage_posts : WordPress fires this action when it’s rendering the filter options tool bar, just before the “Filter” button.
- pre_get_posts : This is a super-important core action in WordPress. It lets you modify any query that fetches posts/pages/images/etc. Lots of plugins use this hook to do their core work. It’s very powerful, and it’s also a very easy way to break your site, if you’re not careful.
The core of wptfma_pre_get_posts() is where we set the meta_query property of the main query. There’s lots of info in the WordPress Codex and on Stack Overflow about how to create and manipulate WP_Query with a custom meta_query.
Save the changes and go to your site’s Media Library – you should see the new filter option in the tool bar. Have a play with it and see how the URL changes when you apply new filters.
That’s Part One sorted! 👍
Adding the Custom Columns
By comparison, this bit is quite easy. All we’re going to do is…
- hook the manage_media_columns filter to add our custom column.
- hook the manage_media_custom_column action that renders custom columns for every row (every image).
- add a small stylesheet to the admin area so we can make our icons green/orange/whatever.
Go back into wpt-find-missing-alt.php and add the following snippet to the end of the file:
/**
 * Add our small admin stylesheet, but only if we're on the media library page.
 */
function wptfma_admin_enqueue_scripts($hook_suffix) {
	if (wptfma_is_on_media_admin_page()) {
		$base_uri = get_stylesheet_directory_uri();
		$version = wp_get_theme()->get('Version');

		wp_enqueue_style(
			'wptfma-admin',
			$base_uri . '/wpt-find-missing-alt/wptfma-admin.css',
			null,
			$version
		);
	}
}
add_action('admin_enqueue_scripts', 'wptfma_admin_enqueue_scripts', 10, 1);

/**
 * Add a custom column for IMG ALT Text present/missing.
 */
function wptfma_manage_media_columns($columns) {
	$columns['alt-text-status'] = 'ALT Text';

	return $columns;
}
add_filter('manage_media_columns', 'wptfma_manage_media_columns');

/**
 * This is called for each image in the media library list/table.
 */
function wptfma_manage_media_custom_column($column_name, $post_id) {
	if ($column_name == 'alt-text-status') {
		if (!empty($alt_text = trim(strval(get_post_meta($post_id, '_wp_attachment_image_alt', true))))) {
			printf(
				'<span class="dashicons dashicons-yes-alt" title="%s"></span>',
				esc_attr($alt_text)
			);
		} else {
			echo '<span class="dashicons dashicons-warning"></span>';
		}
	}
}
add_filter('manage_media_custom_column', 'wptfma_manage_media_custom_column', 10, 2);
You’ll also want to paste this into wpt-find-missing-alt/wptfma-admin.css:
/**
 * wptfma-admin.css
 */
th.column-alt-text-status,
td.column-alt-text-status {
	text-align: center;
}

td.column-alt-text-status .dashicons-warning {
	color: darkorange;
}

td.column-alt-text-status .dashicons-yes-alt {
	color: darkgreen;
}
That’s all there is to the custom columns. In wptfma_manage_media_custom_column() notice how we set the title property of the “dashicons” <span> to the image’s ALT Text. The title property effectively lets you specify mouse-hover tooltips, which is a nice touch.
info Dashicons are built into WordPress and are a quick way of adding standard icons to your projects.
That’s it. In less than 200 lines of code, we’ve added a really useful feature to WordPress’ Media Library.
Have fun sorting out your missing ALT Texts 😎 👍


I have implemented this tutorial on my site and I have found that documents and videos are coming up in the list too. Is there a way to limit the list to just showing images please?
Hi Clare
That’s a good spot. I’ve just made a tweak to the tutorial for you so that if the Media Library is filtered for ALT Texts (missing or present), we also add a filter for the MIME type. Have a look at the WPTFMA_IMAGE_MIME_TYPES constant to see the types we filter for.
I hope this helps
Paul
This in an excellent tutorial. I now know that we have no images without ALT text on our website. From now on I can manage the odd missing alt text easily.
Great stuff. I’m glad it’s been helpful 😎 👍
This should be part of the WordPress core – its an excellent feature. Thank you very much!
I’m glad it’s helpful for you.
I use the plugin on all my projects now. It’s amazing how often it finds an Alt Text that I’ve forgotten to set 👍
Does this DIY version run the cron job? For my use I don’t want to be running a cron job, just want the sort feature
Hi Halyey
This tutorial does not do anything with WP Cron. It only implements the filter.
Hello Headwall,
First, thank you for your work, I appreciate it very much.
But unfortunately, I found two bugs in it.
When I chose the first option –IMG ALT Text I got 9 items.
When I chose the second option images with ALT I got 5 Items it should be 7
when I chose the therd option I got 1 image it should be 2
Could it be from my pages or posts?
I can send screenshot to you if you want.
Best Regards,
walid
Hi Walid
I wonder if it is to do with the meta query relationships (and/or). Are you applying multiple filters, or are you only filtering for missing alt text? You can email an screenshot to me if you like – just use “hello” @ and this website’s domain to send the email.
Paul
Hi Paul,
Thank you for your reply on my post.
After controling the result, I found that the problem is with the image type “avif”. I updated the image array with additional image types like the following and it works fine as you wrote:
“const WPTFMA_IMAGE_MIME_TYPES = array(‘image/png’, ‘image/jpg’, ‘image/jpeg’, ‘image/gif’, ‘image/ico’, ‘image/bmp’, ‘image/webp’, ‘image/heic’, ‘image/heif’, ‘image/svg’, ‘image/avif’, ‘image/tiff’, ‘image/x-icon’);
”
Best regards,
walid
Good work! I’ve updated the tutorial with your updated MIME TYPE list and credited you with the change at the top of the PHP file 👍
thank you very much