
Learn how to use the Cocoen JavaScript module to create before-and-after image sliders in WordPress. We’ll use the built-in WordPress Gallery Block to make it easy to layout the images.


important Make sure you’re using a custom child theme so you can edit functions.php.
How It’s Going to Work
We’re going to use the same technique we’ve used in our Masonry Gallery and Slideshow tutorials – hooking the render_block filter to catch whenever WordPress tries to render a Gallery block.
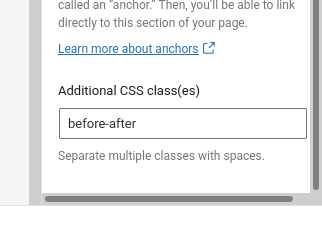
If we detect that a Gallery Block has “before-after” as its CSS class, and it’s got two images in it, we’ll override the default standard HTML with our own.
The JavaScript to make the before-and-after slider isn’t very complex, but there’s no need to write it ourselves when there are some nice libraries out there we can pull in to our project, like Cocoen.
The Cocoen documentation tells is we need to create some HTML like this…
<div class="cocoen">
	<img src="img/before.jpg" alt="" />
	<img src="img/after.jpg" alt="" />
</div>
…and then initialise the before-after-slider in a JavaScript one-liner by searching for a DOM element with the “cocoen” CSS class. But we’re going to embellish it a little bit by wrapping things up in a containing figure, and passing a couple of options so we can set the initial position of the slider (default is 50% – half way) and the colour of the slider. Our HTML will look more like this:
<figure class="before-after" data-before-after-opts="{"start":50,"color":"#fff"}">
<div class="before-after-inner">
<img src="..." alt="Internet cat : before" />
<img src="..." alt="Internet cat : after" />
</div>
<figcaption>Slide to see before and after</figcaption>
</figure>The contents of data-before-after-opts is a JSON representation of the slider’s options:
{
	"start": 50,
	"color": "#fff"
}
To recap, the logic will work like this:
- Intercept the render_block filter
- If WordPress is trying to render a Gallery Block with the CSS class “before-after”, and it has two or more images, then…
- Open a
figurecontainer with the CSS class “before-after” and set data-before-after-opts to the JSON-encoded options - Open a
divcontainer with the CSS class “before-after-inner” – this will become the actual slides - For each of the gallery’s images…
- output the
imgelement
- output the
- Close the inner
div - If the Gallery Block has a caption specified in the Block Editor, then…
- extract the caption’s HTML and add it as a
figcaption
- extract the caption’s HTML and add it as a
- Close the outer
figureelement
- Open a
Let’s Write the Code
In your child theme, create a new file called “wpt-before-after.php” and a folder called “wpt-before-after”. Go into “wpt-before-after” and create empty text files called “wptbai-frontend.css” and “wptbai-frontend.js”.
Download the Cocoen Java Script library from the recommended CDN and save “cocoen.js” in the “wpt-before-after” folder.
To scaffold the project, open wpt-before-after.php and paste the following into it:
<?php

/**
 * WP Tutorials : Before and After Images (WPTBAI)
 *
 * Before and after image slider for WordPress
 *
 * https://wp-tutorials.tech/add-functionality/before-and-after-image-slider/
 */

defined('WPINC') || die();

const WPTBAI_BLOCK_NAME = 'core/gallery';
const WPTBAI_CLASS_NAME = 'before-after';
const WPTBAI_DEFAULT_IMAGE_SIZE = 'full';

const WPTBAI_SLIDER_START_PERCENTAGE = 50;
const WPTBAI_SLIDER_COLOUR = '#fff';

// Image Slider JS module: https://github.com/koenoe/cocoen
const WPTBAI_COCOEN_VERSION = '3.1.1';


function wptbai_enqueue_assets() {
	// ...
}

function wptbai_render_before_after(string $block_content, array $block) {
	// ...
}
add_filter('render_block', 'wptbai_render_before_after', 50, 2);
Next up, go into your child theme’s functions.php file and add the following couple of lines:
// Before and after image slider.
require_once dirname(__FILE__) . '/wpt-before-after.php';
Save all that, reload a page on your site and make sure nothing’s broken.
Notice how we’ve put all the project’s parameters at the top of “wpt-before-after.php”. This is good/standard practice, so if you want to change the default image size from “full” to “medium”, you don’t need to wade through hundreds of lines of code. All the default values are at the top of the main source file, specified as PHP constants.
We’ve got one page-wide parameter we need to pass into the JavaScript, which is the CSS class name we’re using to define our sliders – we can use wp_localize_script() to do this.
The PHP Code
We’ve already gone over the core logic, so just grab the following and paste it into “wpt-before-after.php“, replacing everything that’s already in there:
<?php

/**
 * WP Tutorials : Before and After Images (WPTBAI)
 *
 * Before and after image slider for WordPress
 *
 * https://wp-tutorials.tech/add-functionality/before-and-after-image-slider/
 */

defined('WPINC') || die();

const WPTBAI_BLOCK_NAME = 'core/gallery';
const WPTBAI_CLASS_NAME = 'before-after';
const WPTBAI_DEFAULT_IMAGE_SIZE = 'full';

const WPTBAI_SLIDER_START_PERCENTAGE = 50;
const WPTBAI_SLIDER_COLOUR = '#fff';

// Image Slider JS module: https://github.com/koenoe/cocoen
const WPTBAI_COCOEN_VERSION = '3.1.1';

function wptbai_enqueue_assets() {
	global $wpbai_have_styles_been_enqueued;

	if (is_null($wpbai_have_styles_been_enqueued)) {
		$theme_base_uri = get_stylesheet_directory_uri() . '/';
		$theme_version = wp_get_theme()->get('Version');

		// Our small stylesheet to "fix" a couple of definitions.
		wp_enqueue_style(
			'wpt-before-after',
			$theme_base_uri . 'wpt-before-after/wptbai-frontend.css',
			null,
			$theme_version,
			'all'
		);

		// The main JS module that does the hard work.
		wp_enqueue_script(
			'cocoen',
			$theme_base_uri . 'wpt-before-after/cocoen.js',
			null, // This script has no dependencies.
			WPTBAI_COCOEN_VERSION
		);

		// OurJavaScript  script to initialise everything after page-load.
		wp_enqueue_script(
			'wpt-before-after',
			$theme_base_uri . 'wpt-before-after/wptbai-frontend.js',
			array('cocoen'), // This script depends on the cocoen script.
			$theme_base_uri
		);

		wp_localize_script(
			'wpt-before-after',
			'wptBeforeAfter', // The global JavaScript variable we want to set
			array(
				'className' => WPTBAI_CLASS_NAME,
			)
		);

	}
}

function wptbai_render_before_after(string $block_content, array $block) {
	if (is_admin() || wp_doing_ajax()) {
		// We're not in the front-end.. Don't do anything.
	} elseif ($block['blockName'] != WPTBAI_BLOCK_NAME) {
		// This isn't a WP Gallery block.
	} elseif (!array_key_exists('attrs', $block)) {
		// The gallery block has no attributes. Weird.
	} elseif (!array_key_exists('className', $block['attrs'])) {
		// The className attribute is not specified.
	} elseif (empty($class_name = $block['attrs']['className'])) {
		// The className attribute is empty.
	} elseif (empty($classes = array_filter(explode(' ', $class_name)))) {
		// The className attribute is empty.
	} elseif (!in_array(WPTBAI_CLASS_NAME, $classes)) {
		// "before-after" isn't in the list of CSS classes for the block.
	} elseif (empty($inner_blocks = $block['innerBlocks']) || !is_array($inner_blocks)) {
		// The gallery has no image blocks in it.
	} else {
		$image_ids = array();
		foreach ($inner_blocks as $inner_block) {
			if ($inner_block['blockName'] != 'core/image') {
				// This inner block is not an image.
			} elseif (($image_id = intval($inner_block['attrs']['id'])) <= 0) {
				// This inner image block has an invalid/missing id.
			} else {
				$image_ids[] = $image_id;
			}

			// We only need the first two image ids.
			if (count($image_ids) >= 2) {
				break;
			}
		}

		// Only proceed if we've got 2 image ids.
		if (count($image_ids) >= 2) {
			// Enqueue our CSS & JS assets.
			wptbai_enqueue_assets();

			// Get this slider's starting percentage and slider colour.
			$start_percentage = apply_filters('wptbai_start_percentage', WPTBAI_SLIDER_START_PERCENTAGE, $block);
			$slider_colour = apply_filters('wptbai_slider_colour', WPTBAI_SLIDER_COLOUR, $block);

			// These get passed through into the JavaScript as the wptBeforeAfter
			// global variable.
			$options = array(
				'start' => $start_percentage,
				'color' => $slider_colour,
			);

			$block_content = sprintf(
				'<figure class="%s" data-before-after-opts="%s">',
				WPTBAI_CLASS_NAME,
				esc_attr(json_encode($options))
			);

			// The before-after-inner element that we'll pass into Cocoen.
			$block_content .= sprintf('<div class="%s-inner">', WPTBAI_CLASS_NAME);
			foreach ($image_ids as $image_id) {
				$image_size = apply_filters('wptbai_image_size', WPTBAI_DEFAULT_IMAGE_SIZE, $image_id, $block);

				$image_url = wp_get_attachment_image_url($image_id, $image_size);
				$image_alt = get_post_meta($image_id, '_wp_attachment_image_alt', true);

				$block_content .= sprintf(
					'<img src="%s" alt="%s" />',
					esc_url($image_url),
					esc_attr($image_alt)
				);
			}
			$block_content .= '</div>'; // .before-after-inner

			// Extract the figcaption from the gallery block's HTML,
			// if there is one.
			if (array_key_exists('innerHTML', $block)) {
				$inner_html = $block['innerHTML'];

				if (($start_index = strpos($inner_html, '<figcaption')) === false) {
					// ...
				} elseif (strpos($inner_html, '</figcaption') === false) {
					// ...
				} else {
					$inner_html = substr($inner_html, $start_index + 1);
					$inner_html = substr($inner_html, strpos($inner_html, '>') + 1);
					$inner_html = substr($inner_html, 0, strpos($inner_html, '</figcaption'));

					$block_content .= sprintf(
						'<figcaption>%s</figcaption>',
						$inner_html
					);
				}

				$block_content .= '</figure>'; // .before-after
			}
		}
	}

	return $block_content;
}
add_filter('render_block', 'wptbai_render_before_after', 50, 2);
Fixing the CSS
WordPress includes some core image styles that cause the Cocoen slider to behave… weirdly. To fix this, we need to unset img.max-width and set the image’s height properly. Open wpt-before-after/wptbai-frontend.css and add the following:
/**
 * WP Tutorials : Before and After Images (WPTBAI)
 *
 * Before and after image slider for WordPress
 *
 * https://wp-tutorials.tech/add-functionality/before-and-after-image-slider/
 */
.before-after img {
	max-width: unset;
	height: 100%;
}

.before-after figcaption {
	margin-top: 1em;
	text-align: center;
	font-weight: bold;
}
tip When you’ve got to the end of the tutorial, try commenting-out the .before-after img definitions to see how the slider behaves.
Front-end JavaScript
The final chunk of work is to tie it all together in the browser. When the page has finished loading, we need to find all the figure elements that have the “before-after” CSS class, loop through them and call Cocoen.create(), as per the Cocoen documentation.
Open wpt-before-after/wptbai-frontend.js and paste the following into it:
/**
 * WP Tutorials : Before and After Images (WPTBAI)
 *
 * Before and after image slider for WordPress
 *
 * https://wp-tutorials.tech/add-functionality/before-and-after-image-slider/
 */
document.addEventListener('DOMContentLoaded', function() {
	'use strict';

	// Uncomment this to verify that the script has loded.
	// console.log('WPT Before After : load');
	if (typeof wptBeforeAfter !== 'undefined') {
		// Uncomment this to verify that we've picked up wptBeforeAfter
		// from wp_localize_script()
		console.log('WPT Before After : init');

		// selector = ".before-after"
		const selector = `.${wptBeforeAfter.className}`;

		document.querySelectorAll(selector).forEach((element) => {
			const options = JSON.parse(element.dataset.beforeAfterOpts);
			const innerElement = element.firstChild;

			Cocoen.create(innerElement, options);
		});
	}
});
You can see where we pick up the wptBeforeAfter.className variable and use it to query the DOM for all instances of our slider figure elements. When we loop through these, we pick up the data-before-after-opts via the dataset property beforeAfterOpts. Then we just grab the firstChild of our figure element (div.before-after-inner) and pass it to Cocoen.create().
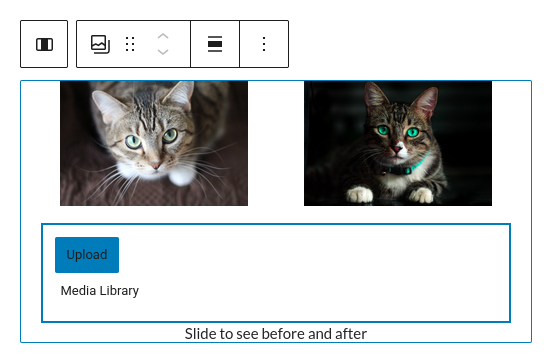
The last thing on the list is to add a Gallery Block to some content, put two images into the gallery, and set the CSS class of the Gallery Block (not the child/image blocks) to “before-after”. Save your content and check it out in the front-end.
Extending the Tutorial
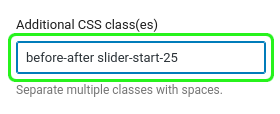
In our core PHP function, we’ve used apply_filters() before we render each slider. This is so we can implement per-gallery manipulation if we want to. Here’s an example of how you can extend this tutorial without actually modifying the original source. If you add the following two functions to your child theme’s “functions.php” file, they will detect additional Gallery Block classes like “slider-start-25” (start the slider at 25%) and “slider-colour-red“. You could, of course, just roll this straight into wptbai_render_before_after(), but using filters and actions in WordPress is good practice because it lets other people extend your code in ways you might not have thought of.
/**
 * Pick up alternative Slider Start positions from the gallery block's
 * CSS classes.
 */
function custom_wptbai_start_percentage($start_percentage, $block) {
	$block_classes = explode(' ', $block['attrs']['className']);

	if (in_array('slider-start-25', $block_classes)) {
		$start_percentage = 25;
	} elseif (in_array('slider-start-75', $block_classes)) {
		$start_percentage = 75;
	} else {
		// Don't override $start_percentage, just let it pass through.
	}

	return $start_percentage;
}
add_filter('wptbai_start_percentage', 'custom_wptbai_start_percentage', 10, 2);

/**
 * Pick up alternative Slider Colours from the gallery block's CSS classes.
 */
function custom_wptbai_slider_colour($slider_colour, $block) {
	$block_classes = explode(' ', $block['attrs']['className']);

	if (in_array('slider-colour-red', $block_classes)) {
		$slider_colour = 'red';
	} elseif (in_array('slider-colour-green', $block_classes)) {
		$slider_colour = 'green';
	} elseif (in_array('slider-colour-blue', $block_classes)) {
		$slider_colour = 'blue';
	} else {
		// Don't override $slider_colour, just let it pass through.
	}

	return $slider_colour;
}
add_filter('wptbai_slider_colour', 'custom_wptbai_slider_colour', 10, 2);
Finishing Up
Have a look at how the constants control the behaviour of the project, with the slider start position and colour being the obvious things to play with.
Instead of just setting all images to “full” or “medium” size, you could pull the size from the Gallery Block’s innerBlocks property. Where we loop through the inner blocks and pull out the image ids, you could also grab the individual image sizes, if you need that sort of granularity.
Happy image-sliding 😎 👍

