
In this copy-and-paste tutorial, we’re going to create a scrolling text marquee banner, like a news-ticker. It will be somewhat configurable, with support for scrolling in either direction (left-to-right or right-to-left). We won’t install any new plugins – just create a few new text files in your WordPress child theme.
How It’s Going to Work
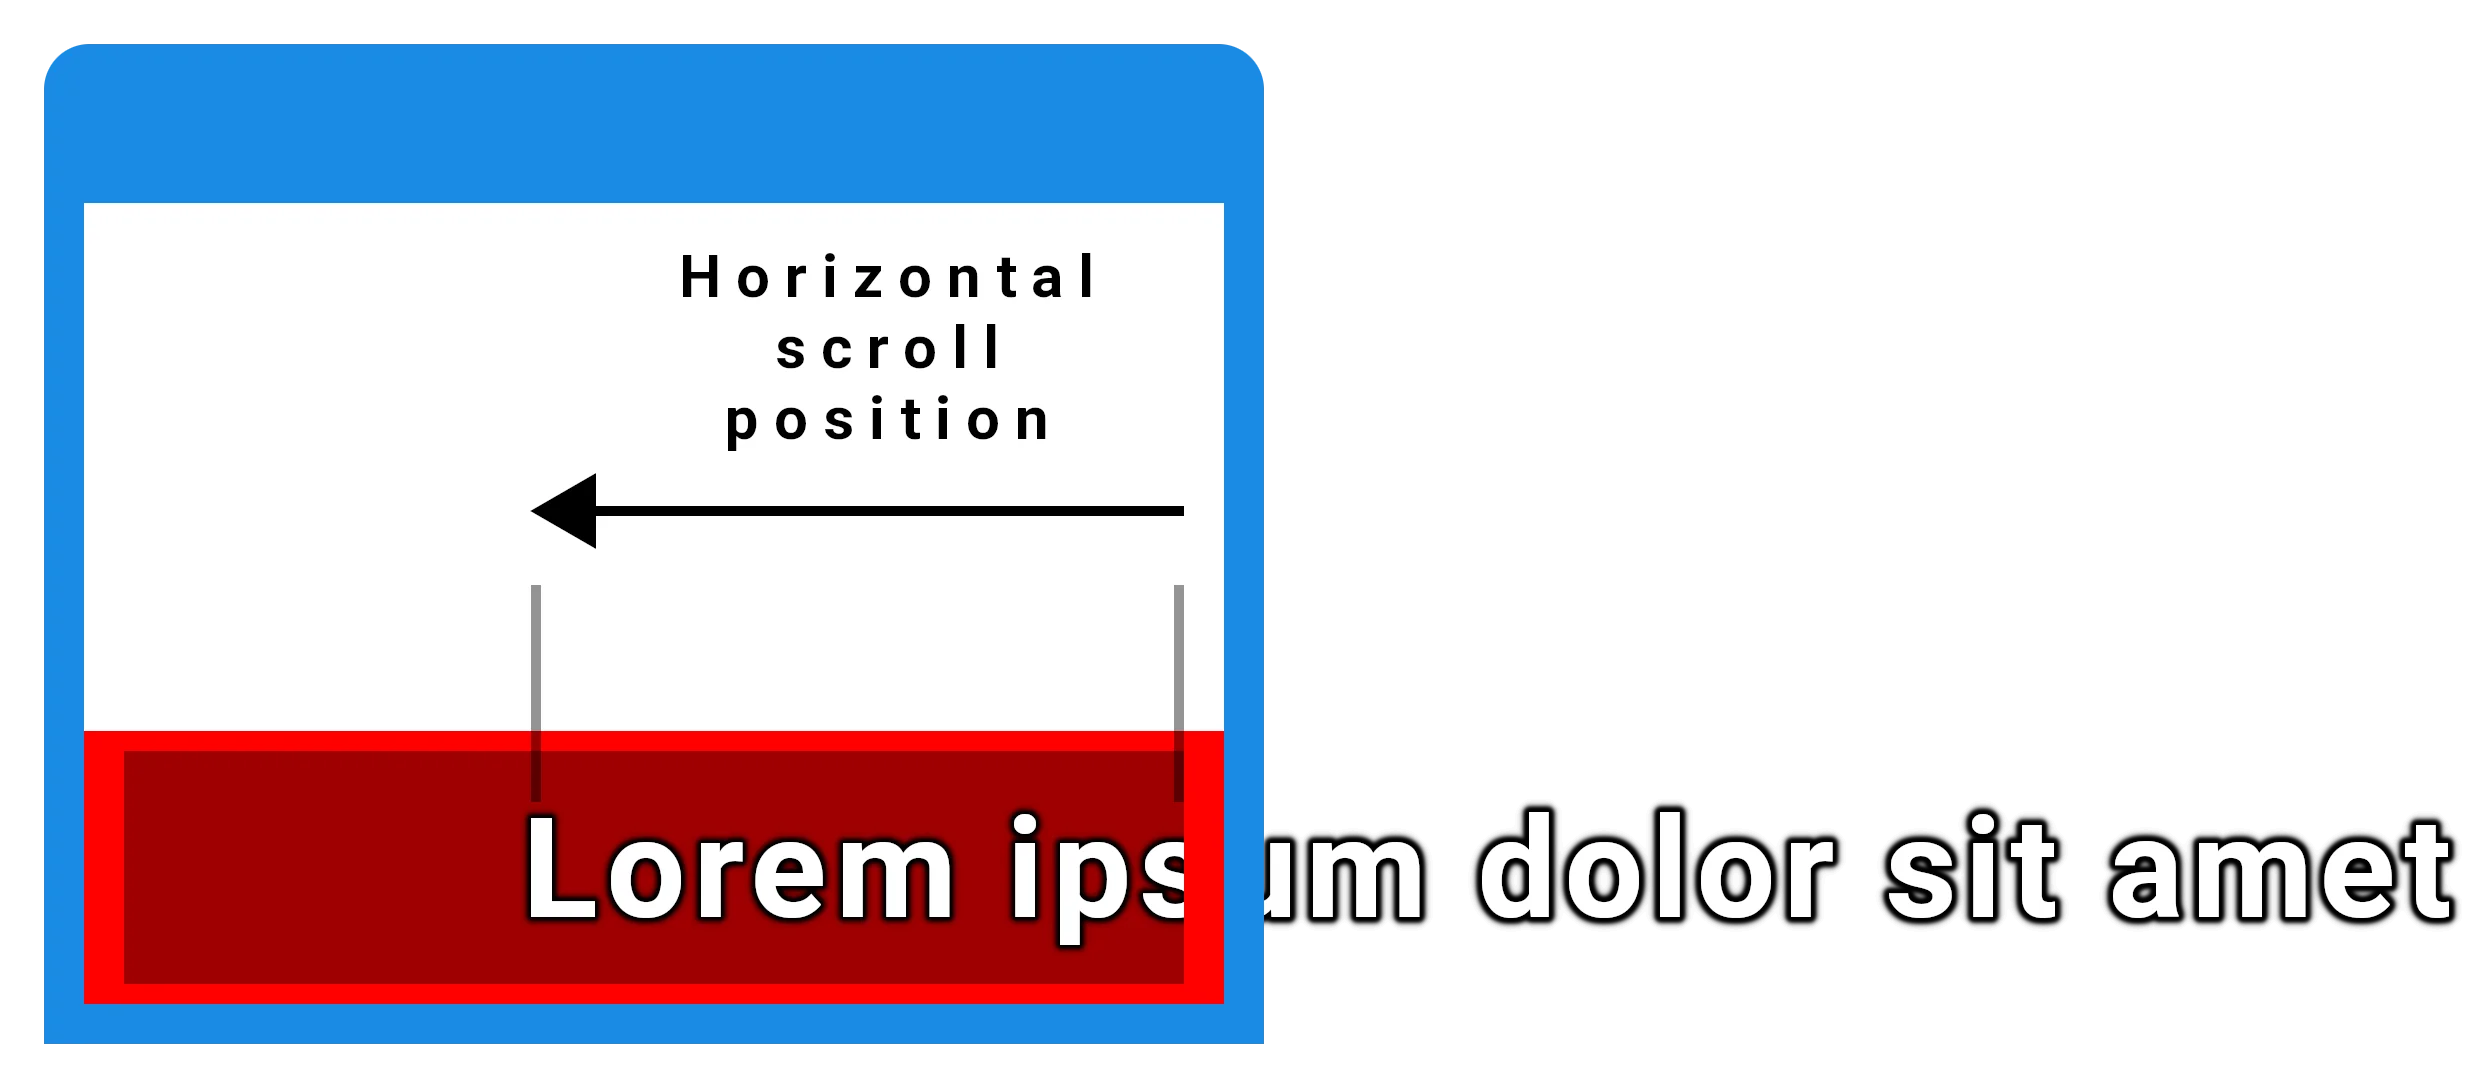
We’re going to use a small series of div elements to represent our scrolling text marquee. The outer container will position the marquee at the bottom of the browser window. The inner container will be our scroll area, and the final element is our ticker text. The ticker text element will be a horizontal div that can be wider than the browser’s window.
To move the ticker text element over time, we’ll use window.requestAnimationFrame() to call our animateMarqueeFrame() function. Each time our function gets called, we’ll know the current time and the time it was called previously. This gives us a “delta time” in milliseconds. Given a target scroll speed (in pixels-per-second), we can calculate how many pixels to move on each animation frame. The maths should be easy to follow in the code.
The Back-end PHP Code
Let’s get started… In your WordPress custom child theme, create a file called “wpt-scrolling-marquee.php” and paste the following into it:
<?php

/**
 * WP Tutorials : Scrolling Marquee (WPTSMQ)
 *
 * https://wp-tutorials.tech/add-functionality/smooth-scrolling-marquee-text-banner/
 */

// Block direct access.
defined('WPINC') || die();

// Scrolling speed in pixels per second.
const WPTSMQ_SCROLL_SPEED = 200;

// How many pixels to over-scroll before we reset the marquee
const WPTSMQ_OVERFLOW_WIDTH = 200;

// Arabic text should use "right" for the scroll direction.
const WPTSMQ_SCROLL_DIRECTION = 'left';

const WPTSMQ_IS_ACTIVE = true;

/**
 * Enqueue our frontend JS & CSS assets.
 */
function wptsmq_enqueue_scripts() {
	if (!empty($marquee = wptsmq_get_marquee())) {
		$theme_version = wp_get_theme()->get('Version');
		$base_uri = get_stylesheet_directory_uri();

		$handle = 'wptsmq';

		wp_enqueue_script(
			$handle,
			$base_uri . '/wpt-scrolling-marquee/scrolling-marquee.js',
			null, // No JavaScript dependencies
			$theme_version
		);

		// Pass our marquee data to our JavaScript.
		wp_localize_script(
			$handle,
			'wptsmqData',
			$marquee
		);

		wp_enqueue_style(
			$handle,
			$base_uri . '/wpt-scrolling-marquee/scrolling-marquee.css',
			null, // No style dependencies.
			$theme_version
		);
	}
}
add_action('wp_enqueue_scripts', 'wptsmq_enqueue_scripts');
Next, open your child theme’s functions.php and add the following couple of lines:
// WPT scrolling text marquee.
require_once dirname(__FILE__) . '/wpt-scrolling-marquee.php';
Make a sub-folder called “wpt-scrolling-marquee”, then create two empty files in there called “scrolling-marquee.css” and “scrolling-marquee.js”.
That’s the bare bones sorted out. Now we can start on the interesting stuff.
Define the Marquee’s Properties
First up, we need to define a marquee’s properties such as its text, speed and direction. If a page-load doesn’t need a marquee, the data structure will be empty. Open wpt-scrolling-marquee.php and add the following at the end of the file.
/**
 * If this page should have a scrolling marquee, create and return a small
 * array containing its meta data.
 *
 * If the page should NOT have a marquee, return an empty array here.
 */
function wptsmq_get_marquee() {
	global $wptsmq_marquee;

	if (is_null($wptsmq_marquee)) {
		if (!is_singular()) {
			// No marquee here.
		} elseif (!WPTSMQ_IS_ACTIVE) {
			// Not active.
		} elseif (empty($scrolling_text = strval(get_post_meta(get_the_ID(), '_marquee_text', true)))) {
			// No marquee here.
		} else {
			$wptsmq_marquee = array(
				'text' => $scrolling_text,
				'isActive' => WPTSMQ_IS_ACTIVE,
				'speed' => WPTSMQ_SCROLL_SPEED,
				'overflowWIdth' => WPTSMQ_OVERFLOW_WIDTH,
				'scrollDirection' => WPTSMQ_SCROLL_DIRECTION,
			);
		}

		if (!is_array($wptsmq_marquee)) {
			$wptsmq_marquee = array();
		}

		$wptsmq_marquee = (array) apply_filters('wptsmq_marquee', $wptsmq_marquee);
	}

	return $wptsmq_marquee;
}
The data structure is an array that we store in a global variable called $wptsmq_marquee. Each page/post can have its own marquee text defined in a custom field (post meta) called “_marquee_text”.
We’ve used the Advanced Custom Fields plugin (ACF) to create a text field called “_marquee_text”. This field is available to edit on posts and pages.
infoFor more information on creating a custom field, see our auto-numbered-headings tutorial. There’s a nice section on how to create a field using ACF.

So… when wptsmq_get_marquee() returns an empty array, the page has no scrolling marquee text. But, when wptsmq_get_marquee() returns an array with something in it, the effect is present.
Render the Marquee’s HTML
Now we can control which pages have marquee text, let’s render the HTML. Open wpt-scrolling-marquee.php again and add the following action-handlers to the end of the file.
/**
 * Add the "has-marquee" CSS class to the body.
 */
function wptsmq_body_class($classes) {
	if (!empty($marquee = wptsmq_get_marquee())) {
		$classes[] = 'has-marquee';
	}

	return $classes;
}
add_filter('body_class', 'wptsmq_body_class', 10, 1);

/**
 * Render the HTML for our marquee container at the end of the document's
 * body element.
 */
function wptsmq_wp_footer() {
	if (!empty($marquee = wptsmq_get_marquee())) {
		echo '<div class="wptsmq-marquee-container">';
		echo '<div class="wptsmq-marquee-inner">';

		// When the page loads, we want the marquee text to be hidden before we
		// move it to the right-hand-side starting position.
		echo '<div class="wptsmq-marquee-text" style="visibility: hidden;">';

		// Important: We rinse our text through wp_kses_post() to keep the
		// HTML clean.
		echo wp_kses_post($marquee['text']);

		echo '</div>'; // .wptsmq-marquee-text

		echo '</div>'; // .wptsmq-marquee-inner
		echo '</div>'; // .wptsmq-marquee-container
	}
}
add_action('wp_footer', 'wptsmq_wp_footer');
When wptsmq_get_marquee() is non-empty, we add the “has-marquee” CSS Class to the document’s body and render a few DIVs in the WordPress footer (before body tag is closed).
Before we move to the front-end JavaScript stuff, check back over “wpt-scrolling-marquee.php” and see how we’ve got the familiar structure of:
- Our core function,
wptsmq_get_marquee() - A series of action handlers and filter handlers:
wp_enqueue_scripts(action)body_class(filter)wp_footer(action)
Using JavaScript to Scroll the Text
Before we create the scrolling-text code, open “wpt-scrolling-marquee/scrolling-marquee.css” and paste the following into it. We need the styles in there so the overflow-clipping and absolute positioning work.
/**
 * WP Tutorials : Scrolling Marquee (WPTSMQ)
 *
 * https://wp-tutorials.tech/add-functionality/smooth-scrolling-marquee-text-banner/
 */

/**
 * Use CSS variables to control the layout.
 */
:root {
	--marquee-overall-height: 6rem;
	--marquee-border-size: 0.6rem;
	--marquee-text-size: 2rem;
}

body.has-marquee {
	margin-bottom: var(--marquee-overall-height);
}

.wptsmq-marquee-container {
	position: fixed;
	left: 0;
	bottom: 0;
	width: 100%;
	background-color: #ce1c21;
	height: var(--marquee-overall-height);
	padding: var(--marquee-border-size);
}

.wptsmq-marquee-inner {
	position: relative;
	height: calc(var(--marquee-overall-height) - var(--marquee-border-size) * 2);
	overflow: hidden;
}

.wptsmq-marquee-text {
	color: white;
	font-weight: bold;
	font-size: var(--marquee-text-size);
	position: absolute;
	left: 0;
	top: 50%;
	transform: translateY(-50%);
	white-space: nowrap;
	letter-spacing: 0.1em;
}

/* Make Font Awesome 5 icons stand out a bit. */
.wptsmq-marquee-text .fas {
	color: yellow;
	text-shadow:
		-2px -2px 0 black,
		2px -2px 0 black,
		-2px 2px 0 black,
		2px 2px 0 black;
}
Finally… open “wpt-scrolling-marquee/scrolling-marquee.js” and dump this into it:
/**
 * WP Tutorials : Scrolling Marquee (WPTSMQ)
 *
 * https://wp-tutorials.tech/add-functionality/smooth-scrolling-marquee-text-banner/
 */

document.addEventListener('DOMContentLoaded', function() {
	'use strict';

	// Uncomment to confirm the script has loaded.
	// console.log('WPT Scrolling Marquee : load');

	if (typeof wptsmqData !== 'undefined') {

		// Uncomment to confirm the script is initialising and running.
		// console.log('WPT Scrolling Marquee : init');

		// Sanitise the properties we've passed from the back-end.
		wptsmqData.isActive = Boolean(wptsmqData.isActive);
		wptsmqData.speed = parseInt(wptsmqData.speed);
		wptsmqData.overflowWIdth = parseInt(wptsmqData.overflowWIdth);

		// Add some more properties to our state object (wptsmqData).
		wptsmqData.marqueeOuterElement = document.querySelector('.wptsmq-marquee-container');
		wptsmqData.marqueeInnerElement = document.querySelector('.wptsmq-marquee-inner');
		wptsmqData.marqueeTextElement = document.querySelector('.wptsmq-marquee-text');
		wptsmqData.previousFrameTime = 0;
		wptsmqData.hasFirstFrameBeenRendered = false;
		wptsmqData.position = 0;

		// Uncomment to see the contents of our state object.
		// console.log(wptsmqData);

		/**
		 * Main entry point - request the first animation frame from the browser.
		 */
		if (wptsmqData.isActive) {
			window.requestAnimationFrame(animateMarqueeFrame);
		}

		/**
		 * We don't call this function directly, we let requestAnimationFrame
		 * call it for us.
		 */
		function animateMarqueeFrame(timestamp) {
			let deltaTime = 0;

			// If this is noe the first animation frame, calculate how much time
			// has passed since the previous frame was rendered.
			if (wptsmqData.previousFrameTime != 0) {
				deltaTime = timestamp - wptsmqData.previousFrameTime;
			}

			if (deltaTime > 0) {
				let deltaTimeSecs = (deltaTime / 1000.0);
				let deltaPixels = deltaTimeSecs * wptsmqData.speed;
				let maxPosition = wptsmqData.marqueeTextElement.clientWidth + wptsmqData.overflowWIdth + wptsmqData.marqueeInnerElement.clientWidth

				// Calculate the next horizontal offset in pixels.
				wptsmqData.position += deltaPixels;

				// Reset the marquee back to the beginning, if we have gone past
				// the maximum.
				if (wptsmqData.position >= maxPosition) {
					// console.log('RESET the marquee');
					wptsmqData.position = 0;
				}

				// Set the absolute layout position of
				// marqueeTextElement (class="wptsmq-marquee-text").
				if (wptsmqData.scrollDirection == 'right') {
					wptsmqData.marqueeTextElement.style.left = `${wptsmqData.position - wptsmqData.marqueeTextElement.clientWidth}px`;
				} else {
					// Implied 'left';
					wptsmqData.marqueeTextElement.style.left = `${wptsmqData.marqueeInnerElement.clientWidth - wptsmqData.position}px`;
				}

				// If this is the first frame, remove the "visibility:hidden"
				// style property.
				if (!wptsmqData.hasFirstFrameBeenRendered) {
					wptsmqData.marqueeTextElement.style.visibility = '';
					wptsmqData.hasFirstFrameBeenRendered = true;
				}
			}

			// Save the current time so we can calculate how much time has
			// passed when we render the next frame.
			wptsmqData.previousFrameTime = timestamp;

			if (wptsmqData.isActive) {
				window.requestAnimationFrame(animateMarqueeFrame);
			}
		}
	}

});
The logic breaks down like this:
- If
wptsmqDatahas been defined, then…- Sanitise the properties of
wptsmqData - If the marquee is active, then…
- Request the browser calls
animateMarqueeFrame()when it’s ready to render the first animation frame
- Request the browser calls
- Sanitise the properties of
animateMarqueeFrame()- If this is not the first animation frame, then…
- Calculate the time since the previous animation frame (delta time)
- If delta time is greater than zero, then…
- Calculate the new pixel position of the ticker element
- If the ticker element has scrolled all the way through the container element, then…
- Reset the ticker’s position back to zero
- Update the ticker’s position on the page
- Store the current time stamp as the previous time stamp, ready for the next time we execute
animateMarqueeFrame() - If the marquee is still active, then…
- Request the browser calls
animateMarqueeFrame()when it’s ready to render the next animation frame
- Request the browser calls
- If this is not the first animation frame, then…
This is a fairly standard arrangement for running JavaScript animations using window.requestAnimationFrame(). This structure can even form the core of a game loop, but that’s a tutorial for another time.
Wrapping Up
This tutorial uses a custom field (post meta) to assign marquee text to specific posts and pages. If you want something a bit more bespoke, you can hook the wptsmq_marquee filter we created in wptsmq_get_marquee(). For example, you could add a marquee to every product page in a WooCommerce store, with a particular category, using something like this in your theme’s “functions.php” file.
/**
 * Set a specific text marquee for on single product pages, where the product
 * is in the "sports" or the "gym" categories.
 */
function custom_marquee($marquee) {
	if (!function_exists('is_product') || !!is_product()) {
		// WooCommerce is not installed, or this is not a single product page.
	} elseif (!has_term(array('sports', 'gym'), 'product_cat', get_the_ID())) {
		// This product is not in the sports or the gym categories.
	} else {
		$marquee['text'] = '<i class="fas fa-star"></i> SALE NOW ON <i class="fas fa-star"></i>';
	}

	return $marquee;
}
add_filter('wptsmq_marquee', 'custom_marquee');
That’s about it. Happy scrolling! 😎 👍


Great job as always Paul! 😎
Cheers Richard. Glad you like it 👍