
Learn how to migrate a WordPress website to a new server. Backup, copy, restore and get the details right. Update all the links, test the new site, then make a new working backup. If you’re not familiar with the tools, this can sound like a real technical challenge. We’ll go over the procedure, the tools, and how to test everything when you’ve finished.
We’ll assume you’ve already got a WordPress website somewhere. It could be on the Internet web server, or it could be on your laptop using a localhost LAMP/WAMP stack.
tipIf you’re moving your website to Headwall Hosting, we offer free WordPress migration, which means we’ll do all this stuff for you… Or we can help you with support, if you prefer to do it yourself.
importantThis is quite a wordy process, but I recommend you read it from start-to-finish before attempting to move a website to a new server. If you do it right, then it’s quite safe and you won’t lose any data even if things go wrong. But if you rush it and miss out a stage, you could be in for a really bad day 🙁
The Procedure : The Short Version
Migrating a WordPress website to a new server is a fairly repeatable process. You’ll have to do some site-specific bits near the end, depending on the plugins you’re using. We’re going to use the following terms to distinguish the source and the destination.
Origin Server
This is where you’re moving your website FROM. It might be a public web server, or it might be your laptop (localhost) – it doesn’t matter.
Destination Server
This is where you’re moving your website TO. Again, this might be a public web server, or it might be a computer or a laptop.
On the Origin Server…
- Make a full backup of your website before you start anything. If we make a mistake during the migration, we want to be able to get back to where we started.
- Download your website backup to somewhere safe. This will be 4 or 5 files and we’ll download them to your computer/laptop.
- If you’re keeping your domain name and so updating your DNS to point to your new Destination Server, you’ll need to wait until the DNS changes have worked.
On the Destination Server…
- Make sure you’ve got a working WordPress website on the destination server. It can be a stock/empty site, but it should be a working installation of WordPress with all available updates applied.
- Upload the backup you made to the Destination Server.
- On the Destination Server, restore the backup you’ve just uploaded.
- If you’re changing your website’s domain (like if you’re uploading from a personal localhost installation), you’ll need to search-and-replace old URLs to your new/proper website domain name.
- Run some post-installation tasks for various plugins, such as reindexing Yoast SEO.
After the Migration
When you’ve got your website up-and-running on the Destination Server, you should make a full backup. This means you’ll have 2 backups – one from before you started, and another from after you’ve finished.
When I migrate a WordPress website, I also like to install a Broken Link Checker plugin afterwards. Something that runs in the background constantly checking for broken links.
Stage One, on the Origin Server
Backup first. We’re going to use the UpdraftPlus plugin to make a backup of the site on the Origin Server. You can do this with the free version of the plugin easy enough.
Install UpdraftPlus, click on the UpdraftPlus button on the WordPress Admin top toolbar, then click the big button that says “Backup Now”. When you see a pop-up asking about some options, make sure you’ve selected to backup your files AND your database.
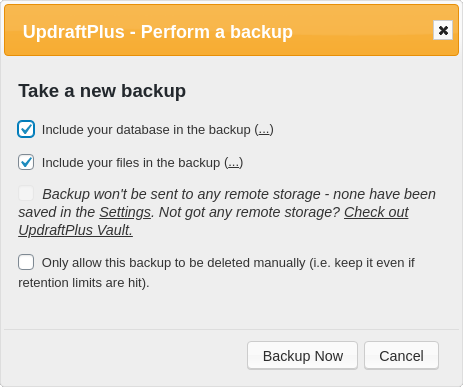
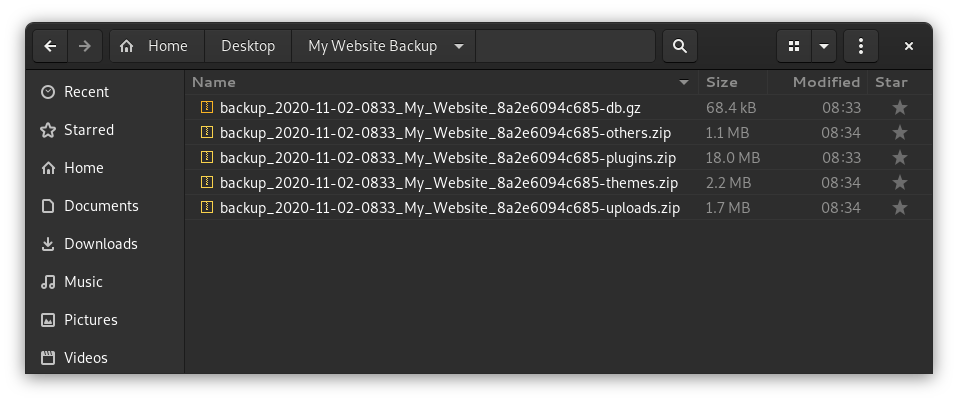
Click Backup Now and wait for UpdraftPlus to do its thing. Once it’s ready, you’ll see the new backup in the list, along with some options. The backup is split over several files, and we need to download each of them to our computer.

Work through each of the buttons here to download the files to your computer. When you’re done, you should end up with a set of files like this. You might have more files than this – if one of your directories is very big then UpdraftPlus will split it into 2-or-more files.
So we’ve got a current set of backup files for our website. It’s a good start!
Stage One-point-Five
If you’re moving a site to a completely different domain (or moving from localhost to a public web server) then this is when you need to sort out your DNS. If you’re migrating your website to Headwall Hosting then we can help you do this bit.
When you’ve got access to your Destination Server, make sure that it already has a WordPress site on it, and that it’s totally up-to-date. Go to Dashboard > Updates and make sure that everything is fully up-to-date. Absolutely everything…. there should be zero warnings, notifications or errors.
Stage Two, on the Destination Server
Upload & Restore from Backup
We need to install the UpdraftPlus plugin on the Destination Server. Once it’s installed, go to the Backup/Restore page, look for the More Tasks option, click Upload Backup Files then upload all of the backup files.
When they’ve all uploaded, you should see your backup at the top of the list, with some actions to the right saying “Restore” and “Delete“. Click Restore and check all the options… because we want to restore everything…

Click Next and complete the wizard. If we’ve done everything correctly, the restoration should finish-up and you’ll see something like this:
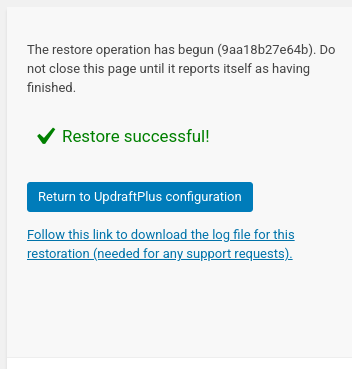
Return to the UpdraftPlus configuration page and then back to the WordPress Admin Area Dashboard.
Take a deep breath…
You’ve done the big bit 🍵
Start Testing the Site & Checking Details
importantAfter you’ve restored your website, the first thing you should do is go to Settings > Permalinks and then click “Save Changes”. This will force WordPress to rebuild your website’s “.htaccess” file and flush the rewrite rules.
importantIn the Admin Area, go to Settings > General and make sure that the website admin email address is correct.
infoIf you’ve got page or JS/CSS caching plugins installed, disable them now. Don’t just clear the caches – disable the plugins. This includes things like Fast Velocity Minify and Leverage Browser Caching. REDIS or memcached are OK – you don’t need to disable those if you’re using one of them.
importantIn the Admin Area, go to your user profile and check that your email address is correct. Then sign-out of the site and back in again to make sure your login works properly.
tipThis might be a good opportunity to change your password.
Now all we really need to do is perform a global search-replace for old URLs. If Yoast SEO is installed, then we should reindex that too.
Search & Replace Old URLs
This bit can break your site royally if you make a mistake – so I recommend you make a new backup now and download the files to your computer.
Install the Better Search and Replace plugin then go to the admin area, Tools > Better Search Replace. We’re going to do three search-and-replace operations here, and we need to be very careful about our settings. We need to get the URL of the front page of the website as it was on the Origin Server, and also as it is now on the Destination Server.
When you’re looking at the site on the Destination Server, make sure you check your browser’s address bar properly – that you’re looking at the full domain name including the “https://” prefix.


In this example we’re migrating a WordPress website from a localhost installation on a laptop, to a real web server:
- Source Server: Front Page URL was http://localhost
- Destination Server: Front Page URL is now https://www.example.org

These options should make sense for our first run – just make sure to select all the tables and uncheck the “Run as dry run?” box. Click “Run Search/Replace” when you’re happy.
Repeat the above process so that you’ve run the following search-and-replace actions.
| Search For | Replace With |
|---|---|
| ://localhost | ://www.example.org |
| ://example.org | ://www.example.org |
| http://www.example.org | https://www.example.org |
Reindex Yoast
infoThis stage is optional – you only need to do it if your site uses Yoast SEO. Yoast maintains an internal index to help it run quickly, and this doesn’t always travel well after a migration. What we want to do is flush Yoast’s index and then rebuild it.
Install the Yoast Test Helper plugin. We’ll uninstall it when we’re finished reindexing. In your site’s Admin Area, go to Tools > Yoast Test and then click the button “Reset Indexables tables & migrations“.

This should only take a moment. When it’s done, go to the (Yoast) SEO menu and then Tools. You should now see a prompt saying Yoast wants to do some optimisation. Click the “Start SEO data optimization” button to complete the process.
You can now uninstall the Yoast Test Helper plugin to keep things clean & tidy.
Finishing Up
If you’re happy with the site on the Destination Server, then make another backup. It’s exactly the same procedure as before. Keep this new backup safe, because it’s effectively your new starting point.
Now you just need to test it all…
- Have a good rummage around your website, clicking on everything you see.
- Check that all the links in the header area, side bar(s) and footer area work properly.
- If any of these links are hard-coded in your custom child theme (in the PHP files, instead of coming from the website’s database) then the search-and-replace procedure might not have found them.
- If you’ve got a breadcrumb trail enabled, check that those links work properly – especially the root/Home breadcrumb. These are easy to forget, and they often break when migrating a WordPress website to a new domain.
- Check each post type. So if you’ve got WooCommerce, make sure the product pages look good. If you’ve got a blog, make sure the single blog post pages work properly, etc…
- Install the Broken Link Checker plugin and let it run in the background. I love this little plugin 🙂
That’s it. You’ve migrated your WordPress to a new server. If you’ve got any caching plugins installed, activate them again now and flush all caches.
Have fun with your new server!

