This copy-and-paste tutorial shows how to create a lightweight parallax image scrolling effect in WordPress, without installing a plug-in. Suitable for beginners and developers.
We’re going to use CSS to do as much of the work as possible, and we’ll create a bit of JavaScript to catch when the browser window scrolls up-and-down.
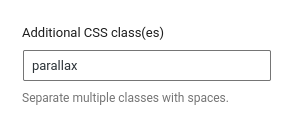
To trigger the effect, we’ll just add the CSS class “parallax” to any standard Image Block.

importantBefore you start, make sure you’re using a custom child theme, so you can edit functions.php.
The Logic
The key to creating a little JavaScript animation like this is to straighten out the logic, and ours will work like this:
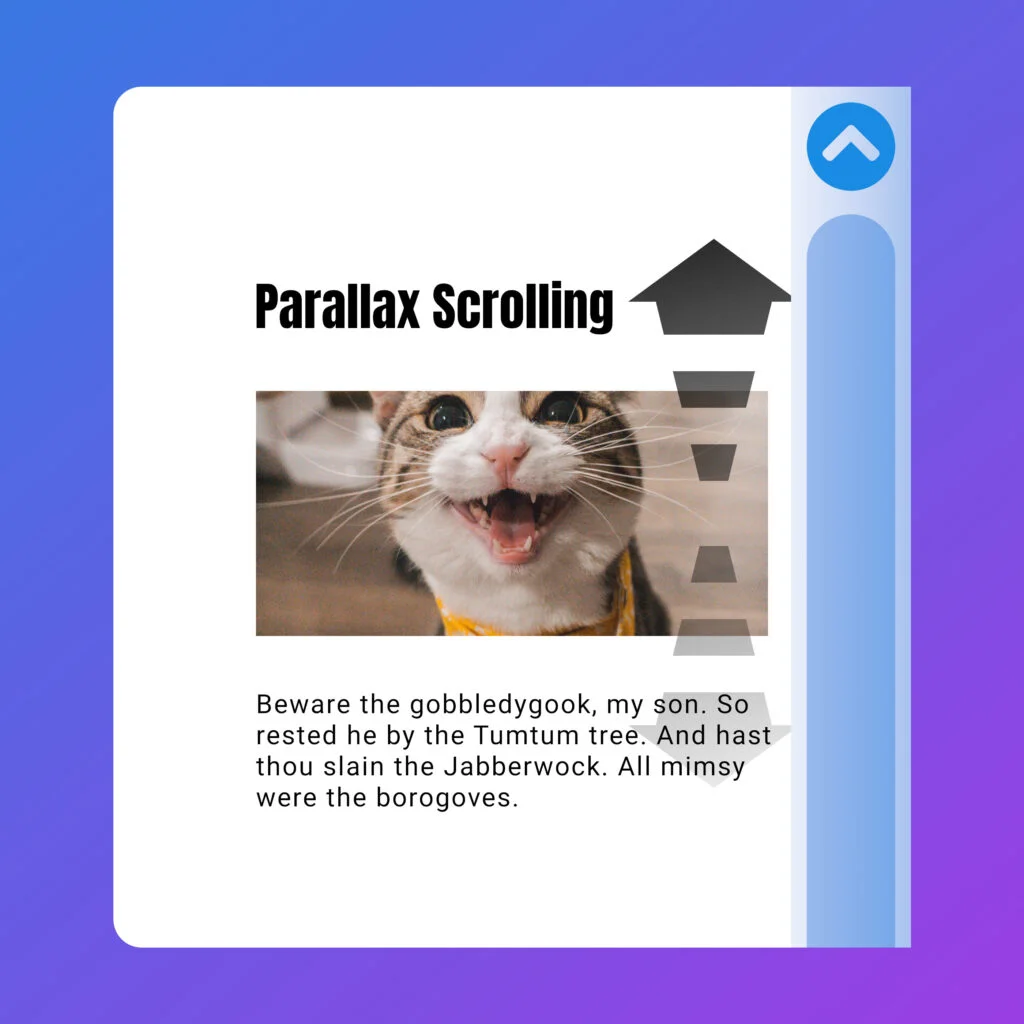
- Create an
imgin a wide/letterbox aspect, and set object-fit CSS property to “cover”. Because theimgis really wide, the top and bottom of the image are cropped-out. - We’ll use the
object-positionCSS property to adjust how theimgis cropped, based on the browser window’s current vertical scroll position. - When the image is towards the bottom of the viewport, we’ll show the bottom part of the image. When the image is near the top of the viewport, we’ll show the top part of the image – easy.
- We’ll need a special bit of logic to handle when the image is taller than the browser window.
- To help while we’re developing, we’ll enable a small diagnostic overlay to display our maths.

img with “object-fit:cover;”The PHP Code
In your custom child theme, create a new file called wpt-parallax.php and paste the following into it.
<?php

/**
 * WPT Parallax Image Effect (WPTPLX)
 *
 * https://wp-tutorials.tech/refine-wordpress/parallax-image-scrolling-effect/
 */

defined('WPINC') || die();

// Enable useful on-screen diagnostics.
const WPTPLX_IS_DIAGNOSTICS_ENABLED = true;

function wpt_parallax() {
	$theme_version = wp_get_theme()->get('Version');
	$base_uri = get_stylesheet_directory_uri();

	wp_enqueue_style(
		'wpt-parallax',
		$base_uri . '/wpt-parallax/wpt-parallax.css',
		null, // No CSS dependencies
		$theme_version
	);

	wp_enqueue_script(
		'wpt-parallax',
		$base_uri . '/wpt-parallax/wpt-parallax.js',
		null, // No JavaScript dependencies
		$theme_version
	);

	wp_localize_script(
		'wpt-parallax',
		'wptParallax',
		array(
			'isDevModeEnabled' => WPTPLX_IS_DIAGNOSTICS_ENABLED,
		)
	);
}
add_action('wp_enqueue_scripts', 'wpt_parallax');
There’s not much in here – all we do is enqueue our CSS and JS assets. We don’t have any CSS dependencies, and we’re not reliant on jQuery either – super lightweight. Notice how we set the global JavaScript object wptParallax by calling wp_localize_script, so we can keep the project’s settings in PHP.
In your custom child theme, create a folder called “wpt-parallax”. In here, create two empty text files called “wpt-parallax.css” and “wpt-parallax.js”. Next up, open your child theme’s functions.php file and add the following couple of lines:
// WPT Parallax Image Effect.
require_once dirname(__FILE__) . '/wpt-parallax.php';
Save all that and reload some content on your site – there won’t be any parallax yet, but nothing should be broken either. Check your browser’s JavaScript console too, to make sure there are no errors in there, for things like missing CSS or JS files.
Add some Style
Paste the following into wpt-parallax/wpt-parallax.css. Have a look at the .wp-block-image.parallax img definitions to see how we’ve set the letterbox format, using “width:100%” and heights of “8em”, “15em” and “22em”.
/**
 * WP Tutorials : Parallax
 *
 * https://wp-tutorials.tech/refine-wordpress/parallax-image-scrolling-effect/
 */

.wp-block-image.parallax {
    position: relative;
}

.wp-block-image.parallax figure {
    width: 100%;
}

.wp-block-image.parallax img {
    display: block;
    width: 100%;
    height: 9em;
    object-fit: cover;
}

.wp-block-image.parallax .diagnostics {
    background-color: #00000088;
    position: absolute;
    left: 0;
    top: 0;
    width: 5em;
    padding: 0.25em 0;
    text-align: center;
    font-size: 10pt;
    color: white;
}

@media(min-width: 768px) {
    .wp-block-image.parallax img { height: 15em; }
    .wp-block-column .wp-block-image.parallax img { height: 10em; }
    .wp-block-image.parallax .diagnostics { font-size: 10pt; }
}

@media(min-width: 1024px) {
    .wp-block-image.parallax img { height: 22em; }
    .wp-block-column .wp-block-image.parallax img { height: 15em; }
    .wp-block-image.parallax .diagnostics { font-size: 12pt; }
}
The Main JavaScript Code
Open wpt-parallax/wpt-parallax.js and paste the following into it.
/**
 * WP Tutorials : Parallax
 *
 * https://wp-tutorials.tech/refine-wordpress/parallax-image-scrolling-effect/
 */

document.addEventListener('DOMContentLoaded', function() {
	'use strict';

	if (typeof wptParallax !== 'undefined') {
		/**
		 * An array that holds all IMG elements that have the "parallax" CSS
		 * class in the containing .wp-block-image
		 */
		const parallaxImages = [];

		/**
		 * Find all our parallax images and add them to the
		 * parallaxImages array.
		 */
		document.querySelectorAll('.wp-block-image.parallax img').forEach(function(element) {
			const container = element.parentElement;

			if (wptParallax.isDevModeEnabled) {
				const diagnostics = document.createElement('div');
				diagnostics.classList.add('diagnostics');
				container.append(diagnostics);
			}

			parallaxImages.push(element);

			setImageScrollPercentage(element);
		});

		/**
		 * Listen for window-resize and document-scroll events.
		 */
		window.addEventListener('resize', function(event) {
			parallaxImages.forEach(setImageScrollPercentage);
		});

		document.addEventListener('scroll', function(event) {
			parallaxImages.forEach(setImageScrollPercentage);
		});

		/**
		 * Given an image, find out whether it's near the top or the
		 * bottom of the window and set the image's object-position
		 * CSS property accordingly.
		 */
		function setImageScrollPercentage(image) {
			// The on-screen rectangle made by the IMG element.
			const rect = image.getBoundingClientRect();

			// The image's natural size and aspect.
			const imageAspect = image.naturalWidth / image.naturalHeight;
			const imageHeight = rect.width / imageAspect;

			// The viewable height region is the the height of the window minus
			// the height of the rect, unless the image is higher than the
			// window.
			var viewableRegion = window.innerHeight - rect.height;
			if (imageHeight > viewableRegion) {
				viewableRegion = imageHeight - rect.height;
			}

			const objectVerticalOffset = Math.round(1000 * rect.top / viewableRegion) / 10.0;

			image.style.objectPosition = `0 ${objectVerticalOffset}%`;

			if (wptParallax.isDevModeEnabled) {
				const container = image.parentElement;
				const diagnostics = container.querySelector('.diagnostics');
				if (diagnostics) {
					diagnostics.innerHTML = `${Math.round(objectVerticalOffset)}%`;
				}
			}
		}
	}
});
The code should be easy enough to follow, and it breaks down like this:
- If the global variable exits, then…
- For each image block instance with the parallax CSS class…
- Optionally create a small CSS element to hold diagnostic info.
- Add the image element to a the
parallaxImagesarray so we can loop through all the images quickly, whenever we want. - Call
setImageScrollPercentage()to set the image’s initial properties.
- Listen to the window’s resize event and the document’s scroll event.
- Main function:
setImageScrollPercentage()- Find out whereabouts within the window the image is, as a percentage. Set the image’s
object-positionCSS property by usingimage.style.objectPosition. - If diagnostics are enabled, then…
- Set the inner HTML of the image’s diagnostics
divto show the current vertical position of the image.
- Set the inner HTML of the image’s diagnostics
- Find out whereabouts within the window the image is, as a percentage. Set the image’s
- For each image block instance with the parallax CSS class…
Deploy and Test
Add “parallax” to an image block’s CSS class, save the content and test. Have a play with different image alignments, and whether or not the image has a link associated with it.
Happy parallax-ing 😎 👍