
Learn how to split the WooCommerce user login and registration forms into two separate URLs without using a plugin. We’ll also add some custom fields to the registration form, so you can capture things like billing address when new users/customers sign-up.
Project requirements
- We need two front-end URLs. One for the login form, and the other for a user registration form.
- The registration form needs to be customisable with things like billing address, or any other fields (user meta) we want.
- Use standard WooCommerce functionality where possible.
Break it down
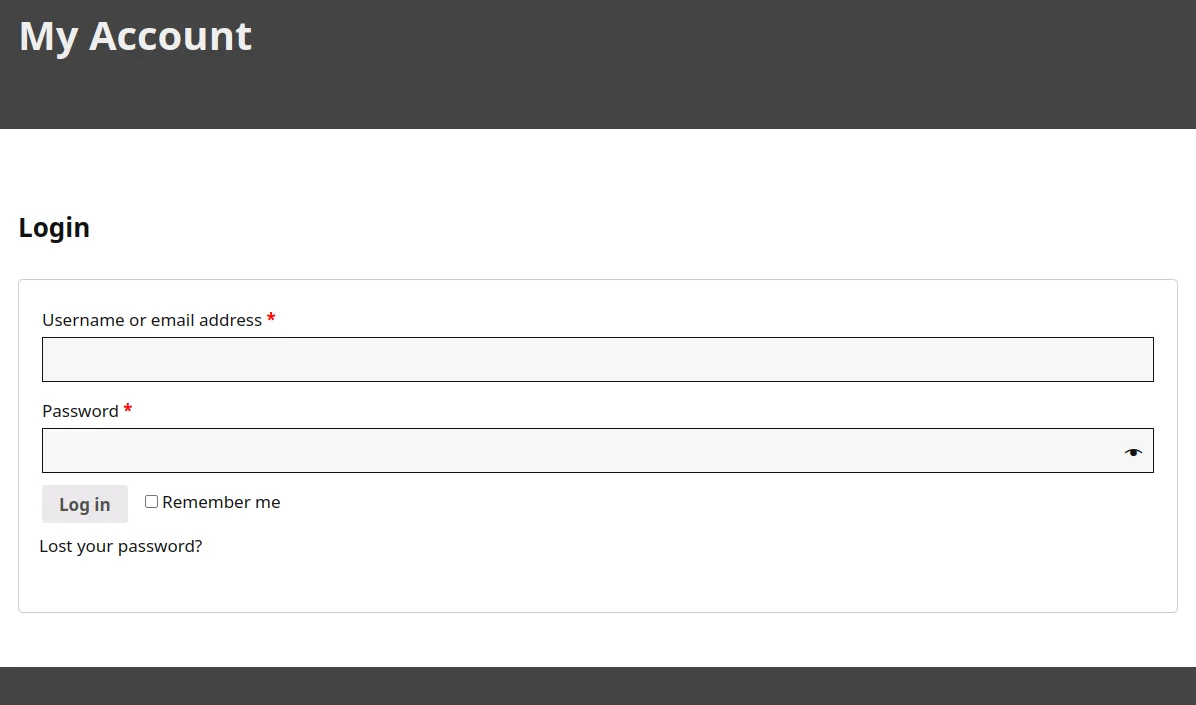
WooCommerce already comes with a login and registration form (on a single page), so the first thing we’ll do is extend that with our custom fields. Here’s the login form with the user registration option enabled:

Before proceeding, you should make sure this works correctly on your site. If you don’t see the “Register” form, log in and go to your site’s admin area, WooCommerce > Settings > Accounts & Privacy (tab). Enable the option to allow account creation on the My Account page:

You’ll probably want to set the default role for new users to “Customer” too:

Featured plugin
The core PHP code
The code for this project is entirely in PHP so we’ll create it all in one go, then break down how it works afterwards.
In your child theme, create a PHP file called wpt-wc-user-reg.php and paste the following lump into it.
<?php
/**
* Headwall WP Tutorials WooCommerce User Registration (WPTWCUR)
*
* https://wp-tutorials.tech/refine-wordpress/user-login-and-registration-with-custom-fields/
*
*/
defined('WPINC') || die();
/**
* The custom fields that we want to capture when new users/customers register
* for an account.
*/
function wptwcur_get_user_registration_fields() {
global $wptwcur_user_registration_fields;
if (is_null($wptwcur_user_registration_fields)) {
$wptwcur_user_registration_fields = array(
'billing_address_group' => array(
'label' => 'Billing Address',
'type' => 'group', // Use "group" as the field type to inject a heading into the field list.
),
'billing_address_1' => array(
'label' => 'Line 1',
'type' => 'text',
'css-class' => 'input-text',
'is-required' => true,
),
'billing_address_2' => array(
'label' => 'Line 2',
'type' => 'text',
'css-class' => 'input-text',
),
'billing_city' => array(
'label' => 'City',
'type' => 'text',
'css-class' => 'input-text',
),
'billing_state' => array(
'label' => 'State',
'type' => 'text',
'css-class' => 'input-text',
),
'billing_country' => array(
'label' => 'Country',
'type' => 'text',
'css-class' => 'input-text',
'value' => 'GB',
'props' => 'readonly',
),
'billing_postcode' => array(
'label' => 'Post code',
'type' => 'text',
'css-class' => 'input-text',
'is-required' => true,
),
'another_field_group' => array(
'label' => 'Another Field Group',
'type' => 'group', // Use "group" as the field type to inject a heading into the field list.
),
'custom_meta_1' => array(
'label' => 'Some Custom String',
'type' => 'text',
'css-class' => 'input-text',
'is-required' => false,
),
'custom_meta_2' => array(
'label' => 'Some Custom Number',
'type' => 'number',
'css-class' => 'input-number',
'is-required' => false,
'min' => 1,
'max' => 10,
),
);
// Filtering the field definitions means we can easily use the code in
// other projects.
$wptwcur_user_registration_fields = (array) apply_filters('wptwcur_user_registration_fields', $wptwcur_user_registration_fields);
// Make sure the custom field definitions have sensible default values
// for properties that haven't been specified.
foreach ($wptwcur_user_registration_fields as $field_name => $field_meta) {
$wptwcur_user_registration_fields[$field_name] = wp_parse_args(
$field_meta,
array(
'label' => '',
'type' => '',
'css-class' => '',
'value' => '',
'props' => '',
'is-required' => false,
)
);
}
}
return $wptwcur_user_registration_fields;
}
/**
* Loop through our custom user registration fields and render them in
* WooCommerce's registration form.
*/
function wptwcur_render_custom_registration_fields() {
if (!empty($custom_registration_fields = wptwcur_get_user_registration_fields())) {
$input_field_types = array('text', 'number');
foreach ($custom_registration_fields as $field_name => $field_meta) {
if ($field_meta['type'] == 'group') {
if (!empty($field_meta['label'])) {
printf('<h3>%s</h3>', esc_html($field_meta['label']));
}
} elseif (in_array($field_meta['type'], $input_field_types)) {
$field_id = $field_name;
// If the field value has been POSTed then the user has probably
// made a form submission that failed validation, so we want to
// take the POSTed value and use it for the field's value, so they
// don't have to type it again.
$field_value = $field_meta['value'];
if (array_key_exists($field_name, $_POST) && !empty($new_value = sanitize_text_field($_POST[$field_name]))) {
$field_value = $new_value;
}
echo '<p class="woocommerce-form-row form-row">';
if (!empty($field_meta['label'])) {
printf(
'<label for="%s">%s',
esc_attr($field_id),
esc_html($field_meta['label'])
);
if ($field_meta['is-required']) {
echo ' <span class="required">*</span>';
}
echo '</label>';
}
// Open the input tag.
printf(
'<input id="%s" name="%s" type="%s"',
esc_attr($field_id),
esc_attr($field_name),
esc_attr($field_meta['type'])
);
if (!empty($field_meta['css-class'])) {
printf(' class="%s"', esc_attr($field_meta['css-class']));
}
if (!empty($field_meta['props'])) {
echo $field_meta['props'];
}
if ($field_meta['type'] == 'number') {
if (!empty($field_meta['min'])) {
printf(' min="%d"', esc_attr($field_meta['min']));
}
if (!empty($field_meta['max'])) {
printf(' max="%d"', esc_attr($field_meta['max']));
}
}
if (!empty($field_value)) {
printf(' value="%s"', esc_attr($field_value));
}
echo ' />'; // Close the input tag.
echo '</p>'; // .woocommerce-form-row
} elseif ($field_meta['type'] == 'date') {
// You could put a date-picker field handler in here.
// ...
} else {
error_log(__FUNCTION__ . ' : Unsupported field type ' . $field_meta['type']);
}
}
}
}
add_action('woocommerce_register_form', 'wptwcur_render_custom_registration_fields');
/**
* Before a new user account is created, WooCommerce lets us modify the
* validation errors object. So we'll loop through our custom fields and add an
* error for each required field that has no value specified in $_POST.
*/
function wptwcur_validate_registration_fields($validation_error, $username, $password, $email) {
if (!empty($custom_registration_fields = wptwcur_get_user_registration_fields())) {
foreach ($custom_registration_fields as $field_name => $field_meta) {
if (!$field_meta['is-required']) {
// OK. Field is not required.
} elseif (array_key_exists($field_name, $_POST) && !empty($_POST[$field_name])) {
// OK. Field exists in $_POST and it's populated.
} else {
$validation_error->add(
'missing',
sprintf('Missing field %s (%s)', $field_meta['label'], $field_name)
);
}
}
}
return $validation_error;
}
add_filter('woocommerce_process_registration_errors', 'wptwcur_validate_registration_fields', 10, 4);
/**
* Loop through our custom user registration fields to see if they are in the
* $_POST array. If any fields are present, sanitise them and add them to the
* user's meta data.
*/
function wptwcur_created_customer($customer_id, $new_customer_data, $password_generated) {
if (!empty($custom_registration_fields = wptwcur_get_user_registration_fields())) {
foreach ($custom_registration_fields as $field_name => $field_meta) {
$field_value = null;
if (!empty($field_meta['type']) && array_key_exists($field_name, $_POST)) {
switch ($field_meta['type']) {
case 'text':
$field_value = sanitize_text_field($_POST[$field_name]);
break;
case 'number':
$field_value = intval($_POST[$field_name]);
break;
// More field-type handlers can go in here, for things like dates
// or drop-down/select lists.
// ...
default:
// Unsupported field type.
break;
}
}
if (!empty($field_value)) {
update_user_meta($customer_id, $field_name, $field_value);
}
}
}
}
add_action('woocommerce_created_customer', 'wptwcur_created_customer', 10, 3);Save that, then edit your child theme’s functions.php file and add the following couple of lines to it:
// Headwall WP Tutorials WooCommerce User Registration (WPTWCUR)
require_once dirname(__FILE__) . '/wpt-wc-user-reg.php';
How it works
The backbone of the project is an array of definitions for the custom user registration form-fields. We hold this in a global variable called $wptwcur_user_registration_fields, and we use the wptwcur_get_user_registration_fields() function to get a copy of the array when we need to loop through it.
Each field definition has the following properties:
- name : Used for the
nameandidof the HTML<input ... />. - type : This tutorial only supports “text” and “number” field types, but you could extend this to include things like dates and drop-down lists.
- label : The on-screen
<label>...</label>to go with the input element. - css-class : The CSS Class(es) you want to add to the input element.
- is-required : Whether or not the field is required.
We’ve got three functions here that deal with the project’s functionality:
- wptwcur_render_custom_registration_fields() : This is called by the
woocommerce_register_formaction. It lets us render the custom fields after the user’s email address, and before the “Register” button. - wptwcur_validate_registration_fields() : Loops through the
$_POSTarray. If it finds that a required field is missing a value, it registers an error that WooCommerce can show to the user in the front-end. - wptwcur_created_customer() : Called after a new user/customer has been created. This is where we loop through all our custom registration fields and add them to the user’s account, using
update_user_meta().
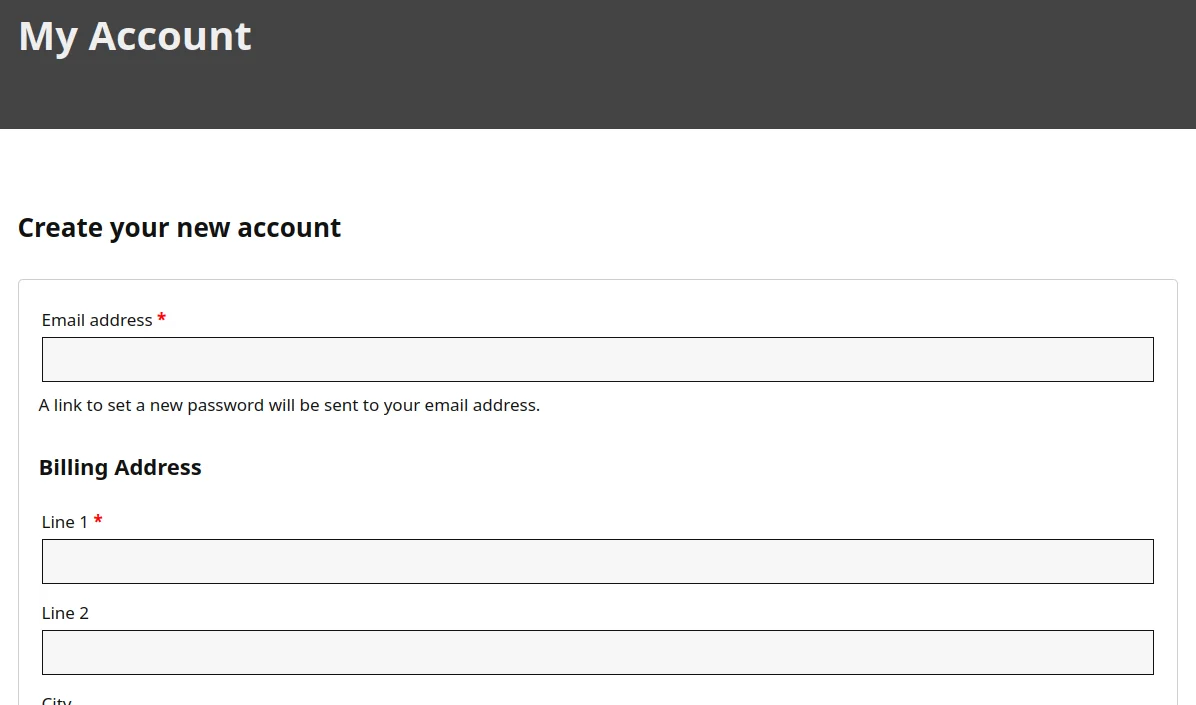
You can try it out now. Log out of your site, go to the my-account endpoint and you should see your custom fields in there.

Create a separate registration form
Splitting this out into two separate forms is straightforward with a neat little hack. First up, disable the option to allow user registration on the My Account page:

Log out of your site and go back to the My Account page. You should see the login form without the registration form.
Next, go back into your child theme, create a file called wpt-wc-form-register.php and paste the following into it:
<?php
/**
* Headwall WP Tutorials WooCommerce User Registration (WPTWCUR)
*
* https://wp-tutorials.tech/refine-wordpress/user-login-and-registration-with-custom-fields/
*
* NOTE: This is based on the user-registration part of the strandard
* WooCommerce login form. You can find the original in the WooCommerce
* plugin.
* wp-content/plugins/woocommerce/templates/myaccount/form-login.php
*/
// Block direct access
defined('WPINC') || die();
// Add the title of your registration form here, or comment it out.
printf(
'<h2>%s</h2>',
esc_html__('Create your new account', 'woocommerce')
);
do_action('woocommerce_before_customer_login_form');
?>
<form method="post" class="woocommerce-form woocommerce-form-register register" <?php do_action('woocommerce_register_form_tag');?> >
<?php do_action('woocommerce_register_form_start');?>
<?php if ('no' === get_option('woocommerce_registration_generate_username')): ?>
<p class="woocommerce-form-row woocommerce-form-row--wide form-row form-row-wide">
<label for="reg_username"><?php esc_html_e('Username', 'woocommerce');?> <span class="required">*</span></label>
<input type="text" class="woocommerce-Input woocommerce-Input--text input-text" name="username" id="reg_username" autocomplete="username" value="<?php echo (!empty($_POST['username'])) ? esc_attr(wp_unslash($_POST['username'])) : ''; ?>" /><?php // @codingStandardsIgnoreLine ?>
</p>
<?php endif;?>
<p class="woocommerce-form-row woocommerce-form-row--wide form-row form-row-wide">
<label for="reg_email"><?php esc_html_e('Email address', 'woocommerce');?> <span class="required">*</span></label>
<input type="email" class="woocommerce-Input woocommerce-Input--text input-text" name="email" id="reg_email" autocomplete="email" value="<?php echo (!empty($_POST['email'])) ? esc_attr(wp_unslash($_POST['email'])) : ''; ?>" /><?php // @codingStandardsIgnoreLine ?>
</p>
<?php if ('no' === get_option('woocommerce_registration_generate_password')): ?>
<p class="woocommerce-form-row woocommerce-form-row--wide form-row form-row-wide">
<label for="reg_password"><?php esc_html_e('Password', 'woocommerce');?> <span class="required">*</span></label>
<input type="password" class="woocommerce-Input woocommerce-Input--text input-text" name="password" id="reg_password" autocomplete="new-password" />
</p>
<?php else: ?>
<p><?php esc_html_e('A link to set a new password will be sent to your email address.', 'woocommerce');?></p>
<?php endif;?>
<?php do_action('woocommerce_register_form');?>
<p class="woocommerce-form-row form-row">
<?php wp_nonce_field('woocommerce-register', 'woocommerce-register-nonce');?>
<button type="submit" class="woocommerce-Button woocommerce-button button<?php echo esc_attr(wc_wp_theme_get_element_class_name('button') ? ' ' . wc_wp_theme_get_element_class_name('button') : ''); ?> woocommerce-form-register__submit" name="register" value="<?php esc_attr_e('Register', 'woocommerce');?>"><?php esc_html_e('Register', 'woocommerce');?></button>
</p>
<?php do_action('woocommerce_register_form_end');?>
</form>
<?php
do_action('woocommerce_after_customer_login_form');Finally, open wpt-wc-user-reg.php and add the following snippet to the end of the file:
/**
 * When WooCommerce asks for the template file for the location of the
 * myaccount/form-login.php file, we can override it with our own page if
 * "?action=register" is in the URL.
 */
function wptwcur_wc_get_template($template, $template_name, $args, $template_path, $default_path) {
	if (($template_name == 'myaccount/form-login.php') && array_key_exists('action', $_GET) && ($_GET['action'] == 'register')) {
		$template = dirname(__FILE__) . '/wpt-wc-form-register.php';
	}

	return $template;
}
add_filter('wc_get_template', 'wptwcur_wc_get_template', 10, 5);
What we’re doing here is hooking WooCommerce’s wc_get_template filter. So, when WooCommerce tries to get the file name of its login form (which is “myaccount/form-login.php”), we check to see if “?action=register” is in the URL. If it is, we replace “myaccount/form-login.php” with our “wpt-wc-form-register.php”.
The contents of “wpt-wc-form-register.php” are essentially copied from part of WooCommerce’s “form-login.php” template, so it has all the same hooks in it for rendering the custom fields.
Go to your site’s My Account page again (while not logged-in) with “?action=register” in the URL…
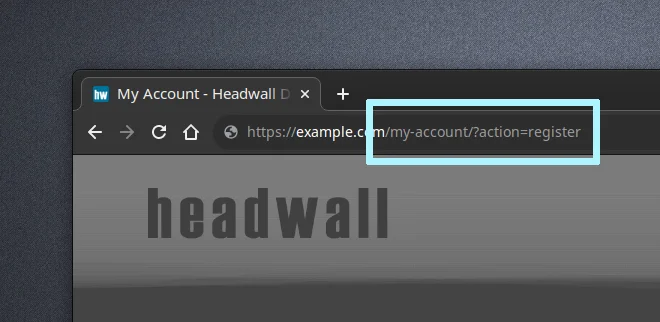
…you should see your account registration form, without the login box:
Extending the code
We’ve only added support for field groups, and text & number fields. An obvious thing to do would be to add support for date-picker fields and drop-down list SELECT fields. All you would have to do is extend wptwcur_render_custom_registration_fields() so it can render the different field types. The values will come back in $_POST array and you can consume them in wptwcur_created_customer().
You could also split the registration form into a totally separate URL slug, instead of using the “?action=register” suffix. There’s a bit more testing to do with that approach, as you’d need to set up a rewrite rule and hook template_redirect, but it would be a bit more polished. But the above approach should be robust – we’re letting WooCommerce do most of the hard work for us.
Have fun with your new user-registration form 😎👍


This is great Paul, thank you. Just what I needed for my latest project.
Cheers Elliot.
I’m surprised this tutorial doesn’t get more traction. It’s a nice win for both customer UX, and the store-admin workflow.