In this tutorial we’ll convert the WooCommerce checkout shipping methods to a drop-down list, or pill-style buttons. We’ll use a standard WordPress method to enqueue some front-end assets, and some jQuery magic to dynamically create a drop-down list. The code is all copy-and-paste, and it’s easy to customise it to your store’s specific needs.
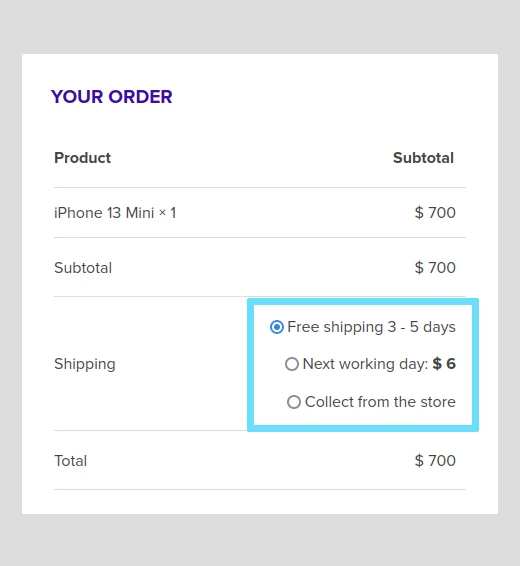
Break Down the Problem
There’s a lot going on with the WooCommerce checkout that we don’t want to break. When the customer changes their billing/shipping details, the list of shipping methods changes dynamically, i.e. without a whole-page reload. So… we want to leave all the standard WooCommerce stuff in there so everything keeps working.
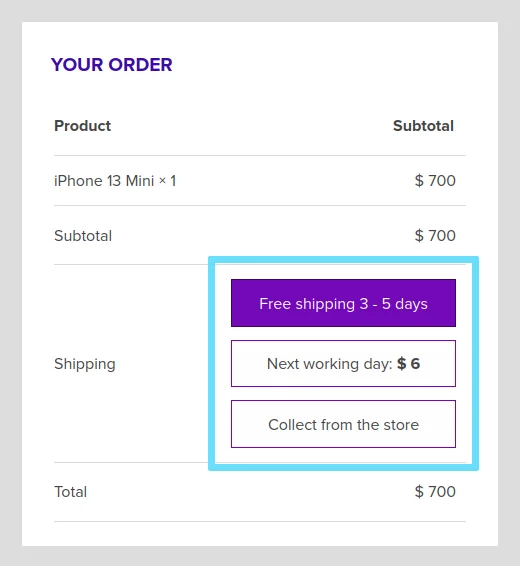
The Pill Buttons
This is easy. We can just the find input[type="radio"] elements and apply some CSS to their labels.
When a label immediately follows an input element…
<li>
	<input id="ctl1" type="radio" />
	<label for="ctl1">Pill One</label>
</li>
…we can use CSS like this to hide the radio button and make the label look like a pill button.
li input[type="radio"] {
	display: none;
}

li input[type="radio"]+label {
	background-color: white;
	border: 1px solid grey;
	color: black;
}

li input[type="radio"]:checked+label {
	background-color: lightgreen;
}
Although we’re hiding the actual radio button, the label is connected to it with for="ctl1" and the label itself is clickable.
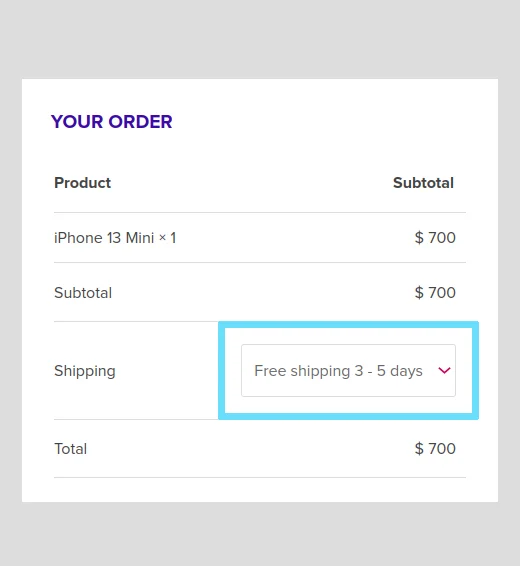
The Dropdown List
We’re going to watch for a WooCommerce JavaScript event called “updated_checkout”. Whenever this fires, our script will search the DOM for all shipping methods defined by input[type="radio"] elements.
If we don’t find any radio buttons, there are no valid shipping methods so we don’t need to do anything. But, if we find one or more radio buttons, we’ll create a <select> element, add some <option> nodes based on the radio elements, and inject it into the table cell after the input elements. We’ll end up with this:
Then all we have to do is detect when the drop-down list changes state, and programmatically trigger a “click” event on the relevant radio button. WooCommerce will detect that the radio button has been “clicked” and do whatever it needs to do.
When we’re happy that it’s working, we can hide the default radio buttons with some simple CSS.
Let’s Write the PHP Core
Because we’re doing most of this with CSS & JS, all we need to do is hook the wp_enqueue_scripts action, see if we’re on the checkout page and then enqueue either the Pills assets, or the Dropdown List assets… depending on which one we want.
In your child theme, create a new file called wpt-customise-shipping-rates.php and paste the following into it.
<?php

/**
 * WP Tutorials : Customise WooCommerce Shipping Rates Layout, CWSRL
 *
 * https://wp-tutorials.tech/refine-wordpress/woocommerce-shipping-methods-as-a-dropdown-list/
 *
 * Changes
 *
 * 2024-12-01 : Added checks so we don't add duplicate shipping methods to the
 *              drop-down (JS).
 *
 *              Fixed the drop-down problem when only one shipping method is
 *              available and it used to hide the only visible method (because
 *              it's not rendered as a radio button).
 *
 *              Added an option to make the drop-down list colspan=2, which is
 *              nice when the shipping descriptions are a bit longer.
 */

// Block direct access
defined('WPINC') || die();

/**
 * Valid values for CWSRL_MODE:
 *    pills
 *    dropdown
 *    empty|default|anything-else
 */
const CWSRL_MODE = 'dropdown';

/**
 * When using "dropdown" mode, add the SELECT element to the TH element after
 * the shipping label and set the TH to colspan=2". It looks a bit tidier.
 * If this makes the checkout look strange in your theme, you can set this
 * back to false.
 */
const CWSRL_WIDE_DROPDOWN = true;

/**
 * Set this to true if you want to see how the drop-down list interacts with
 * the built-in radio buttons. Useful for testing.
 */
const CWSRL_ENABLE_DIAGNOSTICS = false;

/**
 * If the dropdown doesn't appear on the first page-load, set this to true.
 * It fixes a quirk introduced by some checkout plugins & themes (e.g. Astra).
 */
const CWSRL_UPDATE_DROPDOWN_ON_LOAD = false;

function cwsrl_enqueue_scripts()
{
    $theme_version = wp_get_theme()->get('Version');
    $base_uri = get_stylesheet_directory_uri();
    $handle = 'cwsrl';

    if (!function_exists('WC') || (!is_checkout() && !is_cart())) {
        // Either WooCommerce is not installed, or we're not on the checkout/cart pages.
    } elseif (CWSRL_MODE == 'pills') {
        wp_enqueue_style(
            $handle,
            $base_uri . '/wpt-customise-shipping-rates/customise-shipping-rates-pills.css',
            null, // No style dependencies
            $theme_version
        );
    } elseif (CWSRL_MODE == 'dropdown') {
        wp_enqueue_style(
            $handle,
            $base_uri . '/wpt-customise-shipping-rates/customise-shipping-rates-dropdown.css',
            null, // No style dependencies
            $theme_version
        );

        wp_enqueue_script(
            $handle,
            $base_uri . '/wpt-customise-shipping-rates/customise-shipping-rates-dropdown.js',
            ['jquery'], // jquery should already be enqueued, but add it here anyway.
            $theme_version
        );

        wp_localize_script(
            $handle, // same as above
            'cwsrlData',
            [
                'enableDiagnostics' => CWSRL_ENABLE_DIAGNOSTICS,
                'enableWideDropdown' => CWSRL_WIDE_DROPDOWN,
                'updateDropDownOnLoad' => CWSRL_UPDATE_DROPDOWN_ON_LOAD
            ]
        );
    } else {
        // Pass through - normal behaviour.
    }
}
add_action('wp_enqueue_scripts', 'cwsrl_enqueue_scripts');
Notice how we’ve got two constants that control how the code will work, CWSRL_MODE and CWSRL_ENABLE_DIAGNOSTICS. If we’re in “pills” mode then all we do is enqueue a CSS file. But if we want “dropdown” mode, we need to enqueue some JavaScript as well as a small CSS file.
Next, open your child theme‘s functions.php and add the following couple of lines:
// WP Tutorials : Customise WooCommerce Shipping Rates Layout,
require_once dirname(__FILE__) . '/wpt-customise-shipping-rates.php';
Now we just need to create the placeholders for our CSS & JS. Create a folder called “wpt-customise-shipping-rates” and put three empty text files in there:
- customise-shipping-rates-dropdown.css
- customise-shipping-rates-dropdown.js
- customise-shipping-rates-pills.css
Shipping Method Pills
This one is easy – it’s just a bit of CSS. Open “wpt-customise-shipping-rates/customise-shipping-rates-pills.css” and paste the following into it:
/**
 * WP Tutorials : Customise WooCommerce Shipping Rates Layout, CWSRL
 *
 * https://wp-tutorials.tech/refine-wordpress/woocommerce-shipping-methods-as-a-dropdown-list/
 */

.woocommerce ul#shipping_method {
	display: flex;
	flex-direction: column;
	gap: 0.3em;
}

.woocommerce ul#shipping_method li {
	position: relative;
	text-indent: unset !important; /* Fix an Astra issue */
}

/* Hide the default input[type="radio"] controls */
.woocommerce ul#shipping_method li input {
	display: none;
}

.woocommerce ul#shipping_method li input+label {
	padding: 0.5em;
	background-color: #fefefe;
	display: block;
	cursor: pointer;
	border: 1px solid #7209b7;
	text-align: center;
}

.woocommerce ul#shipping_method li input:checked+label {
	padding: 0.5em;
	background-color: #7209b7;
	color: white;
	border-color: #39045b;
}
Save that, make sure that CWSRL_MODE='pills' in your PHP file and then go to your checkout page. If it’s not working, check your JavaScript console for errors – primarily, make sure the CSS file has loaded correctly. If it’s not loaded, you’ll see an error about a 404, or something similar.
Shipping Method Dropdown List
Open “wpt-customise-shipping-rates/customise-shipping-rates-dropdown.js” and paste this JavaScript code into it.
/**
 * WP Tutorials : Customise WooCommerce Shipping Rates Layout, CWSRL
 *
 * https://wp-tutorials.tech/refine-wordpress/woocommerce-shipping-methods-as-a-dropdown-list/
 */
(function($) {
	'use strict';

	if (typeof cwsrlData === 'undefined') {
		// Missing our global data object.
	} else {
		// Make sure thst booleans passed through by wp_localize_script() are
		// represented properly, instead of as strings with "1" or "0" in them.
		cwsrlData.enableDiagnostics = Boolean(cwsrlData.enableDiagnostics);
		cwsrlData.enableWideDropdown = Boolean(cwsrlData.enableWideDropdown);
		cwsrlData.updateDropDownOnLoad = Boolean(cwsrlData.updateDropDownOnLoad);

		// Diagnostics
		// console.log(cwsrlData);

		cwsrlData.updateShippingMethodsDropdown = () => {
			// Diagnostics
			// console.log('updateShippingMethodsDropdown()');

			const shippingMethodContainer = $('.woocommerce-shipping-totals #shipping_method');
			const shippingTableRow = $(shippingMethodContainer).closest('.woocommerce-shipping-totals');
			const radioInputs = $(shippingMethodContainer).find('input[type="radio"].shipping_method');
			const radioInputCount = $(radioInputs).length;

			// Figure out where we're going to add our SELECT element in the DOM.
			let shippingMethodTableCell = null;
			if (radioInputCount > 0 && cwsrlData.enableWideDropdown && !cwsrlData.enableDiagnostics) {
				shippingMethodTableCell = $(shippingTableRow).find('th');
				shippingMethodTableCell.prop('colspan', '2');
			} else {
				$(shippingTableRow).find('th').prop('colspan', '1');
				shippingMethodTableCell = $(shippingTableRow).find('td');
			}

			// If there already exists a drop-down list form a previous iteration,
			// get rid of it now.
			$('.wpt-shipping-methods').remove();

			if (radioInputCount <= 0) {
				$(shippingTableRow).addClass('no-dropdown');
			} else {
				$(shippingTableRow).removeClass('no-dropdown');

				// Create a new drop-down list an append it to the relevant th or td element..
				const select = $('<select class="wpt-shipping-methods"></select>');
				$(shippingMethodTableCell).append(select);

				// Keep a record of which shipping method values we've added, so we
				// don't add anything twice.
				const addedValues = [];

				$(radioInputs).each(function(index, el) {
					const radioInput = $(this);
					const listItem = $(this).closest('li');
					const shippingMethodLabel = $(listItem).find('label');
					const shippingMethodValue = $(radioInput).val();

					if (!shippingMethodValue) {
						// No value. Weird... so don't do anything.
					} else if (addedValues.includes(shippingMethodValue)) {
						// We've already added this value, so skip past it now.
					} else {
						// Diagnostics
						// console.log(shippingMethodLabel.text());

						// Create an option and append it to our drop-down list, using
						// the value and text of the radio button and its label.
						const shippingMethodOption = $('<option></option>');
						shippingMethodOption.text(shippingMethodLabel.text());
						shippingMethodOption.val(radioInput.val());
						$(select).append(shippingMethodOption);

						if (radioInput.is(':checked')) {
							$(select).val(radioInput.val());
						}

						// Remember that we've added this value.
						addedValues.push(shippingMethodValue);
					}
				});

				$(select).change((event) => {
					const newValue = $(event.target).val();

					// Diagnostics
					// console.log(`Change: ${newValue}`);

					$(`input[value="${newValue}"]`).trigger('click');
				});
			}

			// $(window).on('load', cwsrlData.init);
		};

		$(window).on('load', () => {
			// Some checkouts need setting up immediately, rather than waiting
			// for the regular Woo JS event, "updated_checkout".
			if (cwsrlData.updateDropDownOnLoad) {
				cwsrlData.updateShippingMethodsDropdown();
			}

			// Run our code whenever WooCommerce triggers the updated_checkout event.
			$(document.body).on('updated_checkout', cwsrlData.updateShippingMethodsDropdown);
		});
	}
})(jQuery);
It might look like a bit of a lump, but it’s quite spaced-out and a bunch of lines are console.log(...) diagnostics. The core function is updateShippingMethodsDropdown() and it runs like this:
- Search the DOM for core elements such as the shipping method radio buttons.
- If there’s a drop-down list (one of ours) from a previous iteration, remove it from the DOM now.
- If there are one or more shipping method radio buttons, then…
- Create a new
<select>element and append it to the DOM, after the radio buttons. - For each radio button…
- Create a new
<option>element. - Set its text and value based on the radio button’s value in its label’s text.
- Append the new option to the
<select>element.
- Create a new
- When the value of the
<select>element changes, then…- Find the relevant radio button and trigger a “click” event.
- Create a new
The only fiddly thing that’s going on is responding to WooCommerce’s “updated_checkout” event. If you want to understand the cycle of events in more detail, uncomment the diagnostic console.log() lines and have a play.
Featured plugin
Now you can switch to drop-down layout by setting CWSRL_MODE='dropdown' near the top of the main PHP file, like this:
/**
 * Valid values for CWSRL_MODE:
 *    pills
 *    dropdown
 *    empty|default|anything-else
 */
const CWSRL_MODE = 'dropdown';
When you’re happy that it’s working properly, put the following into “wpt-customise-shipping-rates/customise-shipping-rates-dropdown.css“.
/**
 * WP Tutorials : Customise WooCommerce Shipping Rates Layout, CWSRL
 *
 * https://wp-tutorials.tech/refine-wordpress/woocommerce-shipping-methods-as-a-dropdown-list/
 */

.woocommerce-shipping-totals:not(.no-dropdown) ul#shipping_method {
	display: none;
}

.woocommerce-shipping-totals:not(.no-dropdown) th[colspan='2'] select {
	display: block;
	width: 100%;
	margin-top: 5px;
}

.woocommerce-shipping-totals:not(.no-dropdown) th[colspan='2']+td {
	display: none;
}

/* Add your custom drop-down list CSS here */
/* ... */
And there you have it. An easy way to customise the shipping method chooser in your WooCommerce checkout. Have fun with your shipping 😎 👍




Hi,
The pills option works fine for me, but I struggle to implement dropdown. The last bit of this tutorial is not very clear to me. Could anyone explain it better, please?
Hi Emis.
I’ll make a video walk-through for the tutorial this evening for you. It’ll be online for tomorrow morning.
As part of making the video, I’ll re-test the code to make sure I’ve not left anything out.
That’s great, thank you very much. 🙂
Hello. I have been able to correctly implement the dropdown menu with its different options and prices. But when selecting the different options, the shipping price is not modified accordingly.
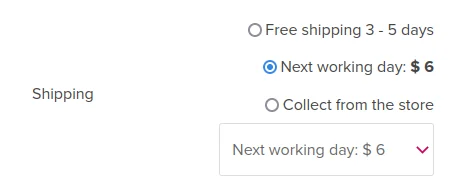
I have tried enabling the option “CWSRL_ENABLE_DIAGNOSTICS = false” and there you can see that selecting different options from the dropdown menu does not change the option of the radio button.
Could you help me solve it please?
Thank you!
When you edit your WooCommerce checkout page, does it use the Block Editor, or does it use the shortcode (classic checkout)? I’ve not tested this tutorial with the newer block editor method and it probably won’t work. Make sure your checkout page just has the classic shortcode in there, like this:
Sorry but i don’t know if it use the Block Editor or the shortcode. Where can I find that information?
As additional information, I can confirm that the pills option works perfectly. The problem occurs with the dropdown option.
Thank you.
I’m having an issue where there’s only one shipping method available for a particular region. What is displayed is just empty field without any information.
“easy way” lol,, right
This tutorial started out easier… than it ended up. 🤔
I think it’s still quite elegant though, and I use it on several clients’ sites.