
Learn how to create a confirm-before-click checkbox for any button on your WordPress site. The button will be disabled until the checkbox is ticked.
You can use this with submission forms, or with regular links/buttons. It’s useful when you’ve got a non-indexed page behind a rel="nofollow" link and you want a simple confirmation action.
How it works
Because we’re going to interact with buttons, checkboxes and event listeners, we need to do most of the work in the browser (JavaScript & CSS). We’ll use a small chunk of PHP to enqueue our assets, and we won’t enqueue our JavaScript on pages where we don’t need it – that would just drag down the page-load speed.
Each button and checkbox will reside in a container element, like a div. If you’re using the Block Editor the containing element can be a Group block, a column, or any other block that can have child blocks.
Here’s an example using the GenerateBlocks Container:
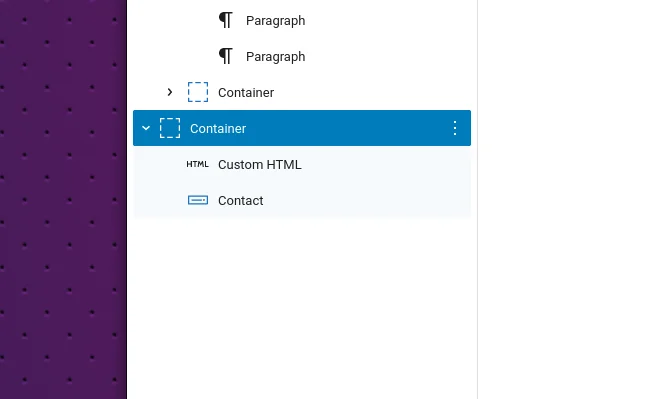
The Container block has two child blocks – a label (which has a checkbox inside it) and a button. We’ve added the confirm-before-click CSS class to the container element – we’ll pick that up in the JavaScript code later.
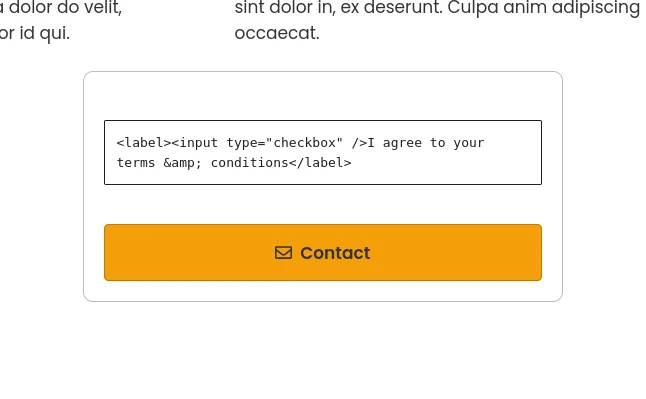
The front-end HTML will look something like this:
<div class="gb-container confirm-before-click"> <label><input type="checkbox" />I agree to your terms & conditions</label> <a href="/contact/" class="gb-button">Contact</a> </div>
After the page loads, the JavaScript will scan the DOM for elements with the confirm-before-click CSS class. For each one it finds, it will add the not-confirmed CSS class to the container and attach an event listener to the checkbox. When the checkbox changes state (unchecked or checked), the event listener will make sure the container has either not-confirmed or is-confirmed in its class list, like this:
<div class="... confirm-before-click not-confirmed">
	<label>...</label>
	<a ...>Contact</a>
</div>
<div class="... confirm-before-click is-confirmed">
	<label>...</label>
	<a ...>Contact</a>
</div>
Scaffold the code
In your child theme, create a new file called wpt-confirm-before-click.php and paste the following into it:
<?php

/**
 * Headwall WP Tutorials : Confirm Before Click (WPTCBC)
 *
 * https://wp-tutorials.tech/add-functionality/disable-a-button-until-a-checkbox-is-ticked-in-wordpress/
 *
 */
defined('WPINC') || die();

// I've included gb-button because I use GeneratePress &
// GenerateBlock for most of my projects.
const WPTCBC_BUTTON_SELECTOR = 'button, .button, .gb-button';

function wptcbc_is_enabled()
{
    $is_enabled = is_singular();

    // Hook wptcbc_is_enabled to control which URLs should
    // include our JS/CSS assets.
    $is_enabled = (bool) apply_filters('wptcbc_is_enabled', $is_enabled);

    return $is_enabled;
}

function wptcbc_enqueue_scripts()
{
    if (wptcbc_is_enabled()) {
        $theme_version = wp_get_theme()->get('Version');
        $base_uri = get_stylesheet_directory_uri();

        wp_enqueue_style(
            'wptcbc', // Stylesheet handle
            $base_uri . '/wpt-confirm-before-click.css',
            null, // No style dependencies
            $theme_version
        );

        wp_enqueue_script(
            'wptcbc', // Script handle
            $base_uri . '/wpt-confirm-before-click.js',
            null, // No JS dependencies
            $theme_version,
            [
                'in_footer' => true
            ]
        );

        // Hook the wptcbc_button_selector if you want more control
        // over the element selector for the main button(s).
        $element_selector = apply_filters('wptcbc_button_selector', WPTCBC_BUTTON_SELECTOR);

        // Define a global JavaScript variable called wptcbc with
        // our button element selector in it.
        WP_localize_script(
            'wptcbc', // Script handle should match that from wp_enqueue_script()
            'wptcbc', // This will be the name of our global JavaScript object
            [
                'buttonSelector' => $element_selector
            ]
        );
    }
}
add_action('wp_enqueue_scripts', 'wptcbc_enqueue_scripts');
The core function here is wptcbc_enqueue_scripts(), which enqueues our JS & CSS assets on page-load. But we only do that if wptcbc_is_enabled() returns true. By default, this is only on “singular” URLs such as a post, a product, a page, etc… i.e. not archive URLs.
Next open your child theme’s functions.php and add the following couple of lines:
// Headwall WP Tutorials : Confirm a checkbox to enable a button
require_once dirname(__FILE__) . '/wpt-confirm-before-click.php';
Create two new empty files in your child theme called:
- wpt-confirm-before-click.css
- wpt-confirm-before-click.js
Save all that and reload your site – everything should still work.
The core JavaScript
Open wpt-confirm-before-click.js and paste the following into it:
/**
 * Headwall WP Tutorials : Confirm Before Click (WPTCBC)
 *
 * https://wp-tutorials.tech/add-functionality/disable-a-button-until-a-checkbox-is-ticked-in-wordpress/
 *
 */

document.addEventListener('DOMContentLoaded', () => {
	'use strict';

	// Diagnostics
	// console.log('confirm-before-click : load');

	if (typeof wptcbc === 'undefined') {
		console.log('Confirm-before-click disabled');
	} else {
		wptcbc.init = () => {
			// Diagnostics
			// console.log('confirm-before-click : init');

			document.querySelectorAll('.confirm-before-click').forEach((container) => {
				const checkbox = container.querySelector('input[type="checkbox"]');
				const button = container.querySelector(wptcbc.buttonSelector);

				if (!checkbox) {
					console.log('confirm-before-click : Failed to find a checkbox');
				} else if (!button) {
					console.log('confirm-before-click : Failed to find a link/button');
				} else {
					// Diagnostics
					// console.log('confirm-before-click : Configuring a container');

					container.classList.add('not-confirmed');
					button.classList.add('btn-action');

					checkbox.addEventListener('change', wptcbc.checkboxChangedHandler);
					button.addEventListener('click', wptcbc.buttonClickHandler);
				}
			});
		};

		wptcbc.checkboxChangedHandler = (event) => {
			// Diagnostics
			// console.log(`confirm-before-click : Checkbox changed`);

			const container = event.currentTarget.closest('.confirm-before-click');

			if (event.currentTarget.checked) {
				container.classList.remove('not-confirmed');
				container.classList.add('is-confirmed');
			} else {
				container.classList.remove('is-confirmed');
				container.classList.add('not-confirmed');
			}
		};

		wptcbc.buttonClickHandler = (event) => {
			// Diagnostics
			// console.log(`confirm-before-click : Button clicked`);

			const container = event.currentTarget.closest('.confirm-before-click');

			if (!container.classList.contains('is-confirmed')) {
				// Diagnostics
				// console.log(`confirm-before-click : Checkbox is not checked`);

				// Important: Block the JavaScript click event, so the button-click is suppressed
				event.preventDefault();
			} else {
				// OK - pass through.
				// console.log(`confirm-before-click : OK`);
			}
		};

		/**
		 * Main entry point.
		 */
		wptcbc.init();
	}
});
We’ve got three main functions in here:
wptcbc.init()
Find all elements with theconfirm-before-clickCSS class and configure the checkbox and button elements.
Add thebtn-actionCSS class to our button so we can manipulate it later.wptcbc.checkboxChangedHandler(event)
Called when one of our checkboxes changes state.
Add/remove thenot-confirmedandis-confirmedCSS class to the container element.wptcbc.buttonClickHandler(event)
Called when one of our buttons is clicked. If the container element does not have theis-confirmedCSS class, block the click event.
Finally, open wpt-confirm-before-click.css and add these basic styles into it.
/**
 * Headwall WP Tutorials : Confirm Before Click (WPTCBC)
 *
 * https://wp-tutorials.tech/add-functionality/disable-a-button-until-a-checkbox-is-ticked-in-wordpress/
 *
 */

.confirm-before-click input[type='checkbox'] {
	margin-right: 1em;
}

.confirm-before-click .btn-action {
	transition: 0.2s opacity;
}

.confirm-before-click.not-confirmed .btn-action {
	cursor: not-allowed;
	opacity: 0.5;
}
Add a checkbox & button to your content
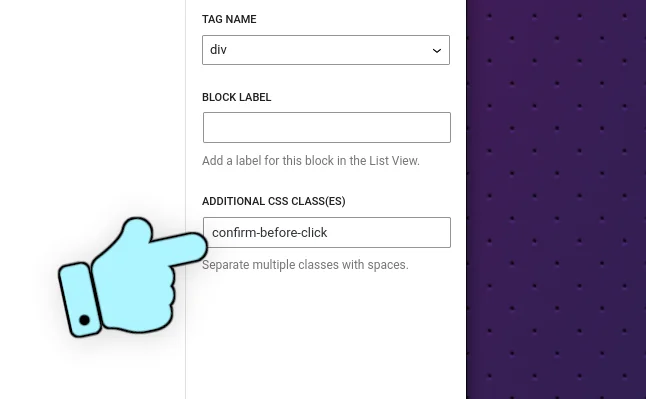
Now all you need to do is add a checkbox to your content, within a container element of your choosing.
importantDon’t forget to add confirm-before-click to your container’s additional CSS classes
WordPress doesn’t (yet) include a native checkbox block, so I’ve just used a simple Custom HTML Block to do this:
<label><input type="checkbox" />I agree to your terms & conditions</label>
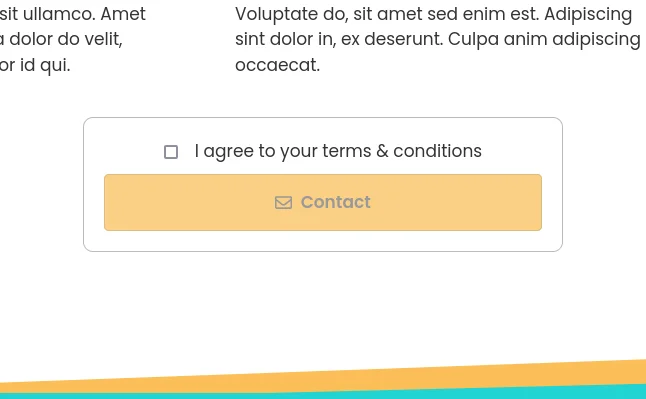
Save everything and make sure the your button is disabled when the checkbox is unchecked. Tick the checkbox and the button should become enabled.
If you’re not sure if the JavaScript is loading/initialising correctly, uncomment the diagnostics in the JavaScript code, open your browser’s Dev Tools pane and reload your content. If the code is loading and running correctly, you’ll see some useful output.
Refining the project
In the PHP file, you’ll notice the constant WPTCBC_BUTTON_SELECTOR specifies an element selector. You might need to change this to suit your theme, although button, .button should cover most of the bases. I’ve added “.gb-button” because I’m using GeneratePress & GenerateBlocks.
That’s it – there’s no plugin and just a bit of lightweight JavaScript to give you more control over your buttons 😎👍


Once again an excellent tutorial from Paul at Headwall.
Cheers Richard – happy to help 👍