
Learn how to use the Yoast SEO plugin to make your WordPress content more palatable to Google. We’ll cover some simple techniques for non-technical content creators. There’s no code here – just useful guides.
importantFor this tutorial to make any sense, you should install the Yoast SEO plugin.
Technical Terms
| Term | What it Means |
|---|---|
| SEO | Search Engine Optimisation. A combination of techniques and processes that make it easier for search engines to index content. |
| Meta Data | Meta Data are “data that describe other data”. In WordPress-land, this means things like author, keywords, excerpts, categories and tags. In book-land… synopsis, author and title are examples of meta data, because they are data that describe the book. |
| Yoast | Yoast is the name of a WordPress plugin – it’s just a piece of software that’s used by loads of websites to assist content creators… helping them to fix their own meta data. There’s a free version and a premium version. |
| Sitemap | An auto-created document that’s part of your website. It tells search engines what content exists at each URL. If Yoast is installed, you can look at your sitemap by going to https://example.org/sitemap_index.xml – Here’s the sitemap for this website: https://wp-tutorials.tech/sitemap_index.xml. Yoast creates and maintains this document for you, as you edit and add-to your website. |
Checklist 1: Yoast SEO for a New Post
This is a robust & repeatable procedure for getting the bulk of your SEO meta data in good shape, right from the start: In WordPress, create a new Post just as you would do normally. Enter the title of your post, but we might tweak this later.
importantDO NOT start writing your post content just yet.
Start With the Meta Description
Scroll down to the “Yoast SEO” box and you’ll see empty textboxes for things like “Focus keyphrase” and “SEO title”. Find the “Meta description” box and type in a description here. Don’t phrase it in a way that tries to “sell” your content to the viewer… Instead, put yourself in the shoes of the viewer, who is scrolling through a list of a million search results. You’ve got less than one second to grab their attention.
Notice the orange horizontal bar underneath where you’re typing. This helps you get the length of the meta description right. If it’s too short, or too long, the bar will be orange. When the length is in the sweet spot, it will be green.
When you’re happy with the meta description, have a look at how your post is going to look in the search results with the little preview. You’ll see the SEO Title, your new meta description and the featured image.

The SEO Title can be different from your post’s actual title. By default, it’s automatically created from your post’s title and your website’s title. But this is only a suggestion. You can delete the purple auto-fields and create a bespoke SEO Title, if you want. If your post’s real title is too long, too short, or too esoteric, you should manually set the SEO Title to something literal and succinct. Check that the title length gives you a green bar, and not an orange bar.
Focus Key Phrase, Post Title, SEO Title & Meta Description
Now add the Focus Keyphrase. Just two or three words that are key to the post. For this tutorial, we’ve gone with “learn yoast” for the focus keyphrase – it’s concise, literal and accurate.
importantReview your post’s main title, the SEO Title and the meta description… All three of these must contain each of your focus keyphrase words.
Keep adjusting/tweaking your focus keyphrase, the post’s main title, SEO Title and Meta Description until the meta description reads well, and the focus keyphrase is included in all three items.
When you’ve done all that, copy your Meta Description and paste it as the first paragraph of your post’s actual content. You can adjust it here so it reads a bit better, but don’t change it too much. Don’t think of this as the first paragraph of your content. Instead, think of it as a description of what’s to follow… Your actual post content should start in the second paragraph.
Optional/Recommended: Copy the Meta Description and set it as the post’s “Excerpt”. If you don’t do this, WordPress will take the first 50 words from the post content and use that as your post’s excerpt/introduction.
That will get you started, and it’s much easier to set up the post meta before writing the content. The post content and the post meta go hand-in-hand. They’re part of the same overall body of work. Neither one of them is an afterthought, or a stand-alone item.
Checklist 2: Fine Tune the Post’s Content
After you’ve created your post, you’ll want to review Yoast’s SEO Analysis. Edit your post and scroll down to the Yoast SEO box again. Look for the “SEO analysis” button and you’ll see a colourful face, like this:

This is a really powerful tool to help fix SEO problems with your content. Just press the button and it’ll tell you what changes you can make to boost it from a red frowny-face to a green smiley-face.
Keep tweaking your post content and re-checking the Yoast SEO Analyser until the SEO Analysis indicator turns into a green smiley face. Here are some tips to help with this stage of optimising your post’s content…
Optimising Content with Yoast’s SEO Analyser
Create at least one link to another page/post on your website, even if it’s just to the “Contact Us” page. Make your link texts descriptive. So… don’t use “Learn More” as link text to another post. Use something like “Learn about my whizz-bang-wotsit” as the link text. Search Engines will do a better job of indexing the link if the link text is descriptive.
Make sure the SEO Score is a green smiley face, and the Readability score is either an amber or a green smiley face. The Readability score is geared towards American audiences, who like shorter sentences, as well as sentences that start with “but”, “so” and “therefore”… Write for your target audience – an amber Readability score is usually fine. A red Readability score is bad, and should be improved.

Always make sure your images have ALT tags. In the ALT tag, describe what’s in the actual image – don’t just stuff keywords into there if it doesn’t make sense to do so. Search Engine algorithms will detect if you’re trying to con them with phony ALT tags, and they will punish your site’s ranking accordingly. When writing an ALT tag, imagine you have poor eyesight and you can’t see the image clearly – the ALT tag should be able to describe the image to you. Screen-reader software often uses image ALT tags.
Checklist 3: The Yoast SEO Configuration Wizard
Yoast is pretty easy to configure, but lots of people either get it wrong, or just flat-out forget to do it. All you really need to do is run the Yoast SEO Configuration Wizard. If you don’t understand something on one of the pages in the wizard, don’t just accept the defaults and move on… Google it to find out what it means… Or follow these instructions…

Run the wizard and choose the option that says whether or not your site is ready to be indexed. If your site is ready to be indexed, Yoast will push your sitemap to Google when you change your site’s content. But if your site is NOT ready to be indexed, Yoast will automatically set up your robots.txt file and stop pushing your sitemap to Google when you add/edit content.
importantWhen you’re working on your staging domain, you absolutely do NOT want to be pushing your sitemap to Google – otherwise when people search for your “whiz-bang-wotsit”, they’ll see your staging website come through in the search results, and you don’t want that. We’ve got a tutorial that covers how to migrate a WordPress site to a staging server.
On the next page, just choose what type of site you’re creating. Usually, it’ll be “blog”, “corporation” or “online shop”, but use your best judgement here.
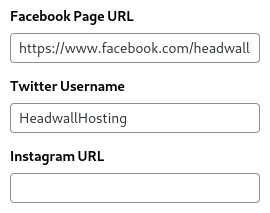
The Socials Page is easy to fill in too. Just be aware that the Twitter option wants your Twitter Handle, but the other social media settings want the full URL. Here are the settings from our Headwall WordPress Hosting website.
Your Site’s Available Post Types can Change
Search Engine Visibility is really important. This lets you choose which post types (types of content) get put into the sitemap. By default, Yoast will try to put everything into the sitemap, but you should restrict this list to just the key content. Usually, this will be Pages, Posts, and Products (if you’re running a shop).
The list of post types will change as you install & uninstall plugins, so you should check back on this page in the wizard from time-to-time.
On the Multiple Authors page, don’t answer the question blindly. This option controls whether the Author Archives pages are active. So, unless you have an explicit reason for enabling the Author Archives pages, you probably want to choose “no” here, even if you do actually have multiple authors creating content on your site.
Finishing the Wizard
The last page is the auto-title page. This controls what gets put into the purple “Site Title” auto-field when you use automatically generated SEO Titles in your posts.
Follow the wizard to the end, and hit Close on the last page.

Checklist 4: Periodic SEO Maintenance
The Yoast SEO plugin is continually being tweaked and added-to, so your site’s SEO optimisation might look good one day, but then mysteriously change to a lot of red frowny faces for no apparent reason. Try to do the following every few weeks – perhaps at the start of each month:
Optimise your SEO Data
Go to SEO > Tools and check the Optimise SEO Data box. If your SEO data need optimising then there will be a purple button saying “Start SEO data optimisation”. Just press it. If your site is already optimised, you’ll see a green indicator confirming you don’t need to do anything.

You’ll need to run this after changing your site’s Permalink Settings, and it’s useful for fixing problems with your site’s breadcrumbs too.
Check Historic Content
For each post type (Page, Post, Product, etc), check you’ve got a lot of green in the two SEO traffic-light columns.

Sometimes these will change from green to amber, either because of an update to Yoast, or maybe you’ve deleted a Broken Link. Keep checking your historic content.
Rerun the Configuration Wizard
It’s a good idea to rerun the configuration wizard from time-to-time. On a busy shop website, I would do this about once-a-week, even if nothing’s changed. On a smaller blog site, once every couple of months should be OK.
Wrapping Up
We’ll come back to this tutorial, as there are more ways to refine your site’s search exposure than we’ve covered here. But… The above checklists are a great way to get started in improving your engagement with the search engines.

