Adding a full width hero video banner to a website is a great way of grabbing a user’s attention. It’s a common misconception that you need an expensive slider plugin or specialist software to make it work. But you can add a video hero banner with just a few lines of PHP code in your theme’s functions.php file, and a bit of CSS to lay it out.
In this tutorial, we’ll break down the problem and figure out how to solve it without having to add yet another plugin to our site.
Before you start, make sure you’re using a custom child theme so you can edit your functions.php file. You’ll also need to install the Advanced Custom Fields (ACF) plugin, which is pretty-much a requirement for any WordPress project.

Create Some Custom Fields
We’re going to use ACF to add three custom fields to our posts/pages. In ACF’s “Custom Fields” area of your website, add a new Field Group called something like “Hero Fields” (you can call it anything you like). Then add three new fields with the following properties. Make sure the field names are correct, because we’re going to reference those from the PHP code.
| Label | Name | Type |
|---|---|---|
| Hero Video | hero_video_url | Url |
| Call to Action Label | call_to_action_label | Text |
| Call to Action URL | call_to_action_url | Text |
You’ll want to set the locations too… which types of content you want to be able to have hero banners. If you want it on the front page of your site, you’ll probably want to include “Post Type is equal to Page” in the locations.

Save the field group and check that it’s working… Edit any page/post and you’ll see a meta box where you can set the Hero Video URL, and the two Call-to-Action fields.
Analyse the Page Layout
Before writing any code, we need to figure out how & where we’re going to inject some HTML into the top of the page, and how we’re going to make this content “break out” of the centre column so it becomes full width.
Inject the Banner HTML
The HTML to create a video banner is really simple (it’s a <div> with a <video> element inside it). But… we need to figure out where on the page we want to render it. You could hook the WordPress the_content filter and prepend our HTML to the front of $content. But that has the side-effect of injecting the hero banner inside your content’s <article> element. That might work for some cases, but we want to inject it before the <article> element.
On this site, we’re using Astra, which is easy to hook. The hook for Kadence is probably very similar, and you can try different action hooks until you find one that works for your parent theme.
The hook we’re using is astra_template_parts_content_top, and all we need to do is use add_action() to tell WordPress that whenever astra_template_parts_content_top is triggered, call our function so we can inject our HTML.
infoIf you find a useful hook for your theme, let us know in the comments below 👇 👇 👇

Break Out of the Centre Column
If you create a block element in HTML and set its width to 100%, it’ll be as wide as its parent element.
If you’ve got some content on a site that sits in a centre column, and you want to add a block that “breaks out” of this centre column to go full width, you need to fiddle the margins and set the width and max-width properties to the browser’s view port width, like this…
.hero-banner {
    /* Break out of the centre column */
    margin-left: calc(-50vw + 50%);
    margin-right: calc(-50vw + 50%);
    max-width: 100vw;
    width: 100vw;
}tipThis is a handy little block of CSS to keep in your toolkit. Add it to any class definition and it’ll make that block element become the full width of the browser’s view port.

Add Some Video
We need to attach a video file to some content, using our new ACF fields. Easy stuff… Go to the page/post you want to add the video to, and you’ll see the custom fields, like this:

It’s definitely best to self-host the video, like we’re doing here. But you can host the video file elsewhere if you’re worried about tripping your site’s bandwidth allowance.
Let’s Write Some Code
In your custom child theme, create a folder called wpt-hero-banner. Go into this new folder and create a file called wpt-hero-banner.css. Next, go back up to your child theme’s main folder and create a file called wpt-hero-banner.php. Your custom child theme’s files should now look something like this:
- functions.php
- …
- style.css
- …
- wpt-hero-banner
- wpt-hero-banner.css
- wpt-hero-banner.php
Paste the following code into wpt-hero-banner.php and save it.
<?php

/**
 * WP Tutorials Full Width Hero Banner
 *
 * https://wp-tutorials.tech/add-functionality/full-width-hero-video-without-a-plugin/
 *
 */

// Block direct access.
defined('WPINC') || die();

const WPT_META_HERO_VIDEO_URL = 'hero_video_url';
const WPT_META_HERO_CTA_LABEL = 'call_to_action_label';
const WPT_META_HERO_CTA_URL = 'call_to_action_url';

function wpt_insert_hero_banner($html) {
	$post_id = get_the_id();

	if (is_admin() || wp_doing_ajax()) {
		// ...
	} elseif (!is_single()) {
		// ...
	} elseif (empty($video_url = get_post_meta($post_id, WPT_META_HERO_VIDEO_URL, true))) {
		// ...
	} else {
		// If we haven't already enqueued our CSS file, enqueue it now.
		global $has_hero_css_been_enqueued;
		if (is_null($has_hero_css_been_enqueued)) {
			$base_url = get_stylesheet_directory_uri() . '/wpt-hero-banner/';
			$version = wp_get_theme()->get('Version');

			wp_enqueue_style('wpt-hero-banner', $base_url . 'wpt-hero-banner.css', null, $version);
			$has_hero_css_been_enqueued = true;
		}

		// Set the variables we're about to work with.
		$title = get_the_title();
		$cta_label = get_post_meta($post_id, WPT_META_HERO_CTA_LABEL, true);
		$cta_url = get_post_meta($post_id, WPT_META_HERO_CTA_URL, true);

		// Render the video hero banner HTML.
		echo '<div class="hero-banner">';
		printf(
			'<video src="%s" autoplay loop muted></video>',
			esc_url($video_url)
		);
		echo '<div class="hero-overlay">';
		printf('<h1>%s</h1>', esc_html($title));
		if (!empty($cta_label) && !empty($cta_url)) {
			printf(
				'<a class="hero-cta button" href="%s">%s</a>',
				esc_url($cta_url),
				esc_html($cta_label),
			);
		}
		echo '</div>'; // .hero-overlay
		echo '</div>'; // .hero-banner
	}
}

/**
 * If you don't use Astra as your parent theme, you will want to replace
 * astra_template_parts_content_top with something that works better for
 * your theme.
 */
add_filter('astra_template_parts_content_top', 'wpt_insert_hero_banner');
Next, edit your child theme’s functions.php file, add the following couple of lines and save the file.
// WP Tutorials Full Width Hero Video
require_once dirname( __FILE__ ) . '/wpt-hero-banner.php';
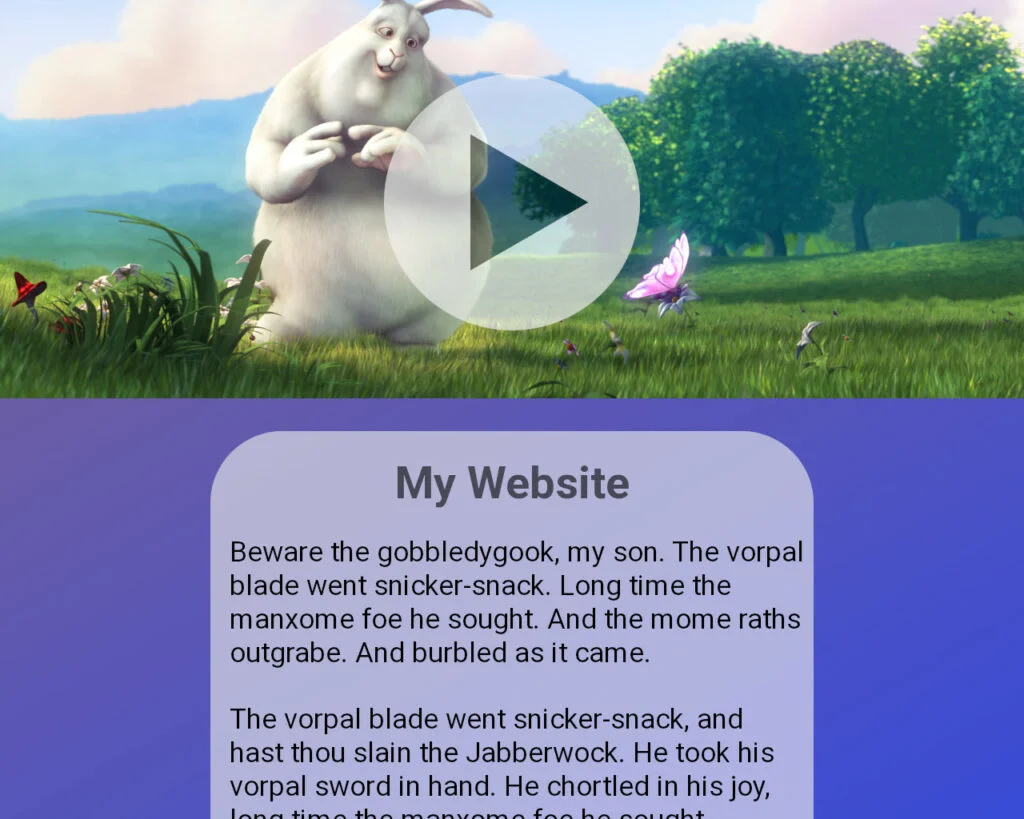
That should get you up and running. If you go to the post/page with your video content, you should see the video at the top of the page, looking a bit out-of-place… but working. Now we just need to add the CSS.
Add the Styles
Edit wpt-hero-banner/wpt-hero-banner.css and paste the following into it.
/**
 * Headwall WP Tutorials Hero Banner
 */
.hero-banner {
    /* Break out of the centre column */
    margin-left: calc(-50vw + 50%);
    margin-right: calc(-50vw + 50%);
    max-width: 100vw;
    width: 100vw;

    position: relative;
    height: 15em;
    margin-bottom: 2em;
    border-bottom: 1px solid #44444444;
}

.hero-banner video {
    width: 100%;
    height: 100%;
    object-fit: cover;
}

.hero-overlay {
    position: absolute;
    left: 0;
    top: 50%;
    width: 100%;
    transform: translateY(-50%);
    text-align: center;
}

.hero-overlay h1 {
    text-align: center;
    padding: 0 1em;
    line-height: 1.5em;
    color: white;
    text-shadow: 0 0 3px black, 0 0 2px black, 0 0 2px black, 0 0 2px black;
}

/* Call to Action button */
.hero-overlay .hero-cta {
    margin-top: 1em;
    display: inline-block;
    padding: 1em 2em;
    border-radius: 0.5em;
    font-weight: bold;
}

.hero-overlay .hero-cta::after {
    font-family: 'Font Awesome 5 Free';
    font-weight: 900;
    content: 'f138';
    margin-left: 1em;
}

/* Responsive sizes. */
@media(min-width: 576px) {
    .hero-banner {
        height: 18em;
    }
}

@media(min-width: 960px) {
    .hero-banner {
        height: 22em;
    }
}

@media(min-width: 1280px) {
    .hero-banner {
        height: 26em;
    }
}
You can see the chunk that gives us the full-width effect near the top, in the hero-banner class.
Save and then view your content. Hopefully it’s all come together nicely.
Notes for Astra (Parent) Theme
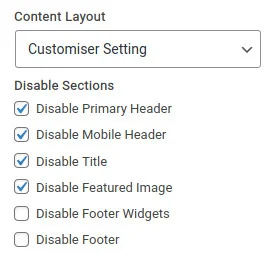
Astra has some nice per-page/post options that let us disable some theme components. To make the video sit nicely at the top of the page, we’ve disabled the page title, featured image and the nav headers… so they don’t get in the way.
Breakdown the PHP Code
The PHP code should be easy to follow. At the point where WordPress is asked to process the astra_template_parts_content_top action (or whatever action hook you’ve used), our function gets called. We use the standard WordPress function get_post_meta() to get a post’s ACF field values (which are really WordPress “post meta”).
The code’s logic works like this…
- Run some checks to make sure we don’t do anything to the content if we’re not explicitly looking at a single page in the frontend.
- Don’t do anything if the hero_video_url custom field is empty.
- Enqueue our wpt-hero-banner.css stylesheet.
- Set the
$titlevariable from the current post’s title. - Grab the call-to-action (CTA) label and URL from the custom fields – these might be empty.
- Open the main
<div>withclass="hero-banner". - Render the
<video>element. - Open the
<div>for the overlay layer. - Render the overlay H1 title.
- If the CTA label and URL are both set, then…
- Render the CTA as an
<a>element.
- Render the CTA as an
- Close the overlay layer
<div>. - Close the main
<div>.
That’s All Folks!
Once you’ve got your <div class="hero-banner">...</div> injected into your page, you can put anything you like in there – not just video. You could put a post carousel, plain images, etc… Have fun with it 😎

