
Change the WooCommerce single product image gallery into a grid layout, where the featured image and gallery thumbnails are all the same size. For variable products, the top-left image is dynamic… it shows the image of the selected product variation.
importantMake sure you’re using a custom child theme, because we’re going to override a WooCommerce PHP template file.

Overriding WooCommerce core templates
The key to changing core WooCommerce content is understanding how its template system works.
All WooCommerce content is broken down into PHP template files, and each template file might reference other (smaller) template files in a tree-like way. To change parts of the WooCommerce layout, we just need to figure out which PHP file we need to override. When we find a file that we want to change, we need to copy it from the WooCommerce plugin, into our custom child theme’s folder and edit it there.
Find the template file
The first thing we need to do is find the file we need to override. Download the WooCommerce plugin (zip file) to your computer and extract it. Go into the “templates” folder and you’ll see all the PHP files and sub-folders for the layout components. The file we’re looking for is “templates/single-product/product-image.php”.

To override the file, create a folder in your child theme called “woocommerce” (WooCommerce will automatically look in here for overrides). Go into this folder and create a subfolder called “single-product”. Next, copy “product-image.php” from the WooCommerce plugin into this new subfolder in your child theme.
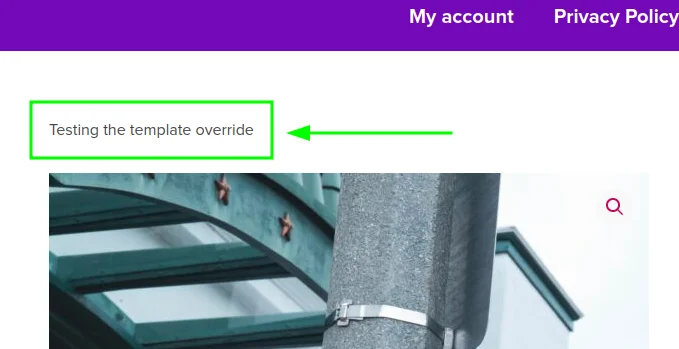
Test it’s working by opening “woocommerce/single-product/product-image.php” (in the child theme) and making a small change, like this:
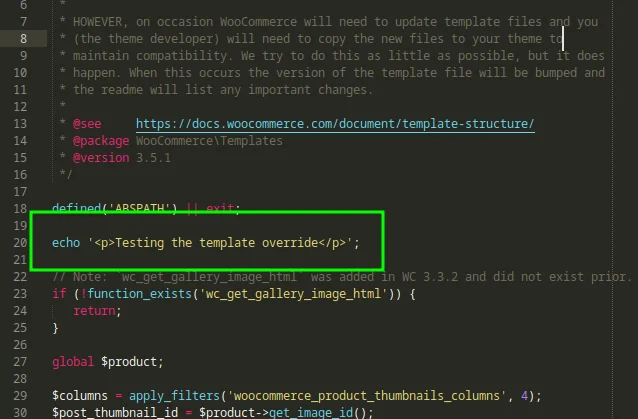
The new template file
When you’ve copied a template from the WooCommerce plugin folder to your child theme, you can start editing it to do what you want. In this file, you can see there’s a chunk of code that renders the product’s main/featured image. Following that, there’s…
do_action( 'woocommerce_product_thumbnails' );…which renders the thumbnail gallery.
We’re going to replace all this code with something that renders the main product image and the gallery thumbnails wrapped in <div> elements – one for each row. So, replace the contents of “product-image.php” (in your child theme) with the following:
<?php

/**
 * Single Product Image
 *
 * This file should go into your child theme as:
 *
 *    woocommerce/single-product/product-image.php
 *
 * If this is not exactly right, WooCommerce won't know to pick it up as a
 * template override.
 *
 * https://wp-tutorials.tech/refine-wordpress/woocommerce-single-product-image-gallery-grid/
 */

defined('ABSPATH') || exit();

global $product;

$column_count = 2;
if (defined('WPTPG_COLUMN_COUNT')) {
	$column_count = WPTPG_COLUMN_COUNT;
}

echo '<div class="woocommerce-product-gallery woocommerce-product-gallery--with-images product-gallery-grid images">';

echo '<figure class="woocommerce-product-gallery__wrapper">';

//  Open the first row.
echo '<div class="product-gallery-grid-row">';
$is_row_open = true;

// Render the featured image (or a placeholder, if there is no image).
if (!empty(($post_thumbnail_id = $product->get_image_id()))) {
	echo wc_get_gallery_image_html($post_thumbnail_id, true);
} else {
	printf(
		'<div class="woocommerce-product-gallery__image--placeholder"><img src="%s" alt="%s" class="wp-post-image" /></div>',
		esc_url(wc_placeholder_img_src('woocommerce_single')),
		esc_html__('Awaiting product image', 'woocommerce')
	);
}

// Render the gallery images (if there are any).
if (is_array($attachment_ids = $product->get_gallery_image_ids())) {
	foreach ($attachment_ids as $attachment_id) {
		echo apply_filters(
			'woocommerce_single_product_image_thumbnail_html', // ...
			wc_get_gallery_image_html($attachment_id),
			$attachment_id
		);
	}
}
echo '</div>'; // .product-gallery-grid-row

echo '</figure>'; // .woocommerce-product-gallery__wrapper

echo '</div>'; // .woocommerce-product-gallery
Although this will layout the HTML correctly, if you load a product page now it will look a bit of a mess because we’ve not sorted out the styling. Here’s what the HTML should look like:
<div class="woocommerce-product-gallery woocommerce-product-gallery--with-images product-gallery-grid images">
	<figure class="woocommerce-product-gallery__wrapper">
		<div class="product-gallery-grid-row">
			<!-- Main featured image goes in here -->
			<!-- The first gallery image goes here -->

			<!-- Second gallery image goes here -->
			<!-- Third gallery image goes here -->

			<!-- Fourth gallery image goes here -->
			<!-- Fifth gallery image goes here -->
		</div>
	</figure>
</div>
Set-up and styles
To tidy things up and add the styling, we need to add some code to the project. In your child theme, create two files called “wpt-product-grid.php” and “wpt-product-grid.css”. Edit wpt-product-grid.php and paste the following into it.
<?php

/**
 * Headwall WP Tutorials : WooCommerce Single Product Image Gallery Grid (WPTPG)
 *
 * https://wp-tutorials.tech/refine-wordpress/woocommerce-single-product-image-gallery-grid/
 *
 * Changes
 *
 * 2024-06-04 : Fixed the 2nd row lightbox problem by putting all images in
 *              a single "row" and letting flex-wrap handle putting the images
 *              into multiple rows.
 *
 * 2024-03-04 : Added WPTPG_DISABLE_STANDARD_LIGHTBOX so you can disable the
 *              built-in lightbox.
 *
 */

// Block direct access
defined('WPINC') || die();

/**
 * How many columns do you want in the  grid? Two is best, I think.
 */
const WPTPG_COLUMN_COUNT = 2;

/**
 * Disable the built-in WooCommerce lightbox?
 */
const WPTPG_DISABLE_STANDARD_LIGHTBOX = false;

function wptpg_is_product_grid_page() {
	return function_exists('is_product') && is_product();
}

function wptpg_initialise() {
	if (wptpg_is_product_grid_page()) {
		$theme_version = wp_get_theme()->get('Version');
		$base_uri = get_stylesheet_directory_uri();

		// Deactivate the built-in gallery lightbox
		if (WPTPG_DISABLE_STANDARD_LIGHTBOX) {
			remove_theme_support('wc-product-gallery-lightbox');
		}

		$handle = 'wpt-product-grid';

		wp_enqueue_style(
			$handle,
			$base_uri . '/wpt-product-grid.css',
			null,
			$theme_version
		);

		// The long element selector about nth-child is to override a built-in
		// WooCommerce style.
		wp_add_inline_style(
			$handle,
			sprintf(
				'
body.woocommerce div.product div.images .woocommerce-product-gallery__image:nth-child(n+2),
.product-gallery-grid-row > * {
   width: %.1d%%;
}
',
				100.0 / WPTPG_COLUMN_COUNT// Our column width as a percentage.
			)
		);
	}
}
add_action('wp', 'wptpg_initialise', 100);

function wptpg_reconfigure_woocommerce() {
	if (wptpg_is_product_grid_page()) {
		// Remove the built-in hover-over-zoom for the featured image.
		remove_theme_support('wc-product-gallery-zoom');

		// We need to dequeue the flexslider script on our grid pages to avoid a
		// JavaScript error.
		wp_dequeue_script('flexslider');
	}
}
add_action('wp_enqueue_scripts', 'wptpg_reconfigure_woocommerce', 100);

/**
 * Override the image size for the gallery images.
 */
function wptpg_adjust_gallery_image_size($image_size) {
	if (wptpg_is_product_grid_page() && is_main_query()) {
		// $image_size = 'full';
		// $image_size = 'thumbnail';
		$image_size = 'large';
	}

	return $image_size;
}
add_filter('woocommerce_gallery_image_size', 'wptpg_adjust_gallery_image_size', 10, 1);
Next, add the CSS into wpt-product-grid.css:
/**
 * Headwall WP Tutorials : WooCommerce Single Product Image Gallery Grid (WPTPG)
 *
 * https://wp-tutorials.tech/refine-wordpress/woocommerce-single-product-image-gallery-grid/
 *
 */
.woocommerce .product-gallery-grid {
	float: left;
	width: 50%;
}

.woocommerce .product-gallery-grid-row {
	display: flex;
	flex-direction: row;
	flex-wrap: wrap; /* Wrap images to the next row */
}

.woocommerce div.product div.images.product-gallery-grid a {
	display: block;
	padding: 10px; /* Change the padding around your image here */
}

.woocommerce div.product div.images.product-gallery-grid img {
	display: block;
	object-fit: cover;
	height: 10em; /* This is the height of your images */
}

@media (min-width: 768px) {
	.woocommerce div.product div.images.product-gallery-grid img {
		height: 15em; /* This is the height of your images */
	}
}
Calculating the column width
We’re using WPTPG_COLUMN_COUNT to determine how many columns we want, so the CSS for the column width needs to be calculated at runtime (we can’t just put it in the CSS file). To do this, we inject some inline styles with some simple maths in it for the column width. Take a look at where we call wp_add_inline_style() in “wpt-product-grid.php”. We use sprintf() to format the output of the maths:
width: %.1d%%| Expression | Meaning |
|---|---|
| %.1d | Output a decimal value to one decimal place |
| %% | Output a literal percentage sign |
Featured plugin

Wrapping up
The final thing to do is open your child theme’s functions.php and add the following couple of lines:
// WP Tutorials : WooCommerce Single Product Image Gallery Grid (WPTPG)
require_once dirname(__FILE__) . '/wpt-product-grid.php';
Save all that and reload your single product page. You should now have a gallery grid, two columns wide 😎👍
That’s all there is to it, really. Have a look through the WooCommerce plugin’s “templates” folder and you’ll see there are loads of other template snippets you can override and customise.


Thank you so much for this! Would it be possible to display it as a grid on desktop and as a gallery on mobile?
Hi Marcel
You should see two columns on mobile devices too, unless something in your theme is overriding a width declaration. So, maybe try this…
In wpt-product-grid.php, find the section that injects the inline style definition:
 .product-gallery-grid-row > * {
 width: %.1d%%;
 }
…and add “!important” to the width, like this…
 .product-gallery-grid-row > * {
 width: %.1d%% !important;
 }
Let me know this works for you.
Is it possible to have a slider on mobile view?
If you want to display the products in a grid for desktop users, and as a carousel/slider for mobile users… that could get a bit messy because you would effectively have two product galleries there (one hidden, and the other visible). That would make the DOM very big.
Maybe this tutorial will help though:
https://wp-tutorials.tech/add-functionality/responsive-post-product-scrolling-carousel/
You could use that carousel/slider to replace the product gallery in the same way we display a grid here.
Or you could look at our plugin here: https://power-plugins.com/plugin/power-slider/
…but I’m not sure that is what you want either. You should check it out though.
It works!
But the problem is with images. The first image is fine. But other images are blurry and small scale. These are actually thumbnails.
How can i call the big images here. I already tried to scale up thumbnails but it will scale up all site thumbnail.
Is its possible to fetch big images here? or can scale up thumbnail only for product page?
Thanks
I’ve modified “wpt-product-grid.php” for you to include a hook for the “woocommerce_gallery_image_size”.
Replace your “wpt-product-grid.php” file with the new one and see how we’ve got…
add_filter('woocommerce_gallery_image_size', 'wptpg_adjust_gallery_image_size', 10, 1);…and our code in wptpg_adjust_gallery_image_size() returns the string “large”. That should help you, I think.
didnt work for me
Your PHP code changes were not applied due to an error on line 13 of file wp-content/themes/Avada/functions.php. Please fix and try saving again.
Uncaught Error: Failed opening required ‘wp-content/themes/Avadahttps://soarinmenswear.kinsta.cloud/wp-content/plugins/woocommerce/templates/single-product/wpt-product-grid.php’ (include_path=’.:/usr/share/php’) in wp-content/themes/Avada/functions.php:13
Stack trace:
#0 wp-settings.php(600): include()
#1 wp-config.php(102): require_once(‘/www/soarinmens…’)
#2 wp-load.php(50): require_once(‘/www/soarinmens…’)
#3 wp-admin/admin.php(34): require_once(‘/www/soarinmens…’)
#4 wp-admin/theme-editor.php(10): require_once(‘/www/soarinmens…’)
#5 {main}
thrown
Hi
From your error message, it looks like a problem in your theme’s functions.php file (line 13). That line in functions.php should look like this:
require_once dirname(__FILE__) . '/wpt-product-grid.php';
For some reason, it’s trying to “required” a file called: “wp-content/themes/Avadahttps://soarinmenswear.kinsta.cloud/wp-content/plugins/woocommerce/templates/single-product/wpt-product-grid.php” but that’s not right. Maybe dirname(__FILE__) is misbehaving?
The first thing to do is double-check line 13 in “wp-content/themes/Avada/functions.php”
Hi, I have a problem with the lightbox, when I clicked on the image, it opens two different lightbox, one is the image that I clicked and the other one is a slider lightbox, how can I get rid of the first lightbox and only leave the slider gallery lightbox.
PS: I’m using Elementor Pro and Hello Elementor.
It was exactly what I was looking for!
I only have problems with Lightbox:
If I click on the first image, ok, I see the gallery
If I click on the second image, ok I see the gallery from the second image
but if I click from the third onwards, I see the gallery from the first image
Hi
I’ve tested it on my dev machine and I get the same problem as you – interesting. For now, I’ve added a const called WPTPG_DISABLE_STANDRAD_LIGHTBOX to the top of “wpt-product-grid.php”. If you set that to true…
WPTPG_DISABLE_STANDRAD_LIGHTBOX = true;
…it will disable the lightbox. The images are still clickable and they link to the correct files.
It should be easy to modify the “product-image.php” template file to use an alternative lightbox, like in my WP lightbox tutorial. Enqueue the FSLightbox JS and use the data-fslightbox attributes to create a gallery. I’ve not tried it, but it would be a fun little extension to this project.
Any fix to the lightbox issue not opening the correct images as you move to the 2nd row?
Oops. I forgot to come back and fix this – I’ve done it just now for you. There are minor changes to both PHP files, and the CSS file.
Basically, instead of rendering multiple DIVs for the gallery (one for each row), we now render a single DIV for all the images and use “flex-wrap:wrap;” to let the browser split the images into multiple rows. I should’ve done it like this when I first wrote the tutorial.